Friday, 28 June 2013

Saying goodbye to 38...

As the 12 year old embraced 12; I was counting down my days of 38 and wondering what the last step to 40 would feel like.  Now, 40 I'm excited about and, I apologise now, I intend to celebrate it in style... 39 feels a little underwhelming; poor 39, always a bridesmaid!

As it is, I've had a wonderful couple of days.  I filled as much of my spare time as I could with the dogs.  Walks with my two and time spent with a new "extended" pack, thanks to the local dog rescue that the 12 year old and I am now volunteering at.  Great people, wonderful dogs; it is bringing a whole new dimension to my life and studies.

Because I'm spending more time away from my two, albeit for a good cause, it makes me want to spend better time with them; varying our walks more and going out for longer. The fields at the bottom of the churchyard were off-limits while my ribs healed but the horses have moved back to their old field now and we've been enjoying the extremely long grass that's taking over instead.  Long grass is one of Megan's favourite things; she barrels through with abandon.  Finn, however, is never more than a foot from my side and will often wait for me to go in front and walk him a path.

I decided to crouch down and see the world from his height and Meggie came to find us.


Finn really does live in a very different world; I'm intrigued to see more of it from his viewpoint and am definitely going to try a few more photographs if he'll be patient with me!

As for the rest of the day, I was spoilt with love and good wishes.  I know I am a lucky woman and so thankful for my family and friends.  I'm even rather liking the sound of 39; still no 40 but pretty damn good so far!

Wednesday, 26 June 2013

What is this? Worldess Wednesday, 26th June 2013


I found it in the garden, comes back every year...

Tuesday, 25 June 2013

It's a Happy Birthday!!

The 11yr old is officially now the 12yr old :o) 


It was a mad weekend of onesies and sleepovers and birthday cake breakfasts...
Happy Birthday my darling xx

Monday, 17 June 2013

The Greenhouse Workbench

The last bloggable excitment of the weekend is the new bench in my greenhouse, which the lovely boyf helped me build... ok, built ;o) ... on Sunday morning, using recycled boards, fence posts and a bit of spare tree.  I love it and have been very happily cluttering it up already!


The leftover fake grass floor was then fit properly in place, I cut around the bench legs so it can be pulled out easily for cleaning.
 
The tomatos, which have been sat on the floor under where the bench now is, have been growing so well that I also had an idea for staking them underneath the bench (until they outgrow them and move outside).  We drilled a series of 12mm diameter holes through the worksurface and trimmed bamboo canes to 6" short of the height bench.  They are held nicely in place, sit flush with the surface of the workbench and can be lifted up and held in place when moving the pots or lifting up the "grass".


There are also hints of colour coming through in the garden now:


A couple of weeks and I'm hoping for a blaze of gloriousness!

The 1873 Corset - inserting the spoon busk and finishing the second half

Saturday morning I mused about the possibility of new garden furniture and the lovely boyf booked a round of golf in for the afternoon (instead of Sunday).  Consequently, just as I was dropping him off, the heavens opened and I retreated home to sew: the second half of the corset was calling...
 
I rather love it when you done something once, the second half just flows.  The only possibly tricky bit was the other side of the spoon busk (easing the buttons though the fabric) but, thanks to the flexibility of the linen I'm using, that went without a hitch.  In fact, thanks to the timestamps on my photos, I know it took 9 minutes from the first photo to the last!  In contrast, on my first corset, made with cotton, the same process took nearly forty minutes.
 
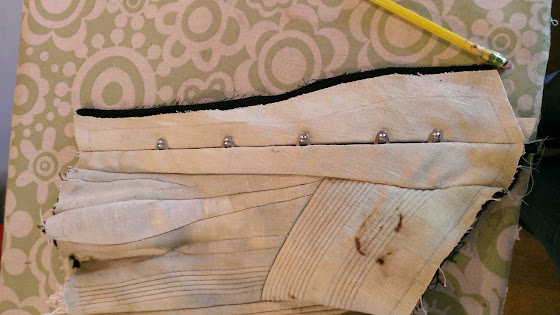
The first step is to stitch and press the new fabric panel and then line it up with the first side of the busk.  Make sure that the seam edges fit neatly and snugly together and then mark the placement of each button.
 
One busk + one matching fabric panel, stitched and pressed


To make the button holes you need an awl and a sharp pencil.  The trick it to carefully separate the threads of the fabric and then create a hole that is big enough to ease the button through, but will not tear the fabric.  If the fabric remains intact it will remain strong and secure; tears will need to be repaired otherwise they gradually will weaken further as the corset is worn.  To make the hole first ease the awl in and gently wiggle it, to part the fabrics, until you have a hole the size of the base of the awl.


One small awl hole...

and one larger pencil hole.
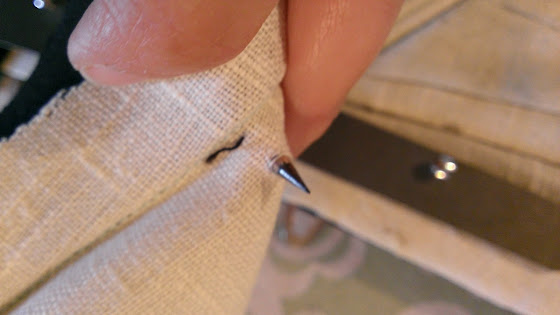
One hole made and the trick is to then gently ease the button through.  The linen made it easy as it is so flexible but it is still so important to take your time and care with this stage as the hole will not be quite big enough and any forcing will cause the fabric to tear.  Once the button is through, gently push the threads back together, around its base, with the awl.


Et voila!  Five perfect button insertions, and a gratuitous glimpse of my gorgeous new slippers ;o)


And we have a corset...


We're getting there, slowly. There's still plenty to do: eyelets (I was too punch drunk to risk them on Saturday, they need a steadier mind and hand!), finishing the seams, hems (including the boning on the bottom ones), the emboidery and any decoration, but for now I shall just enjoy it being in one piece... and have a proper think about how the rest of this mermaid is now going to take shape.

Sunday, 16 June 2013

It's been a big weekend in Chookville

I decided to try mixing the little ones with the rest of the flock.  The original plan was to leave then to it for a couple of hours, as long as they all behaved themselves, but it's gone so smoothly I have no plans to separate them again.

I made two adjustments to the run.  The first was to keep some of the bamboo "wall" in place when I opened it up.  It's big enough that the little ones can move through at speed but it slows the big girls down.  The big girls have not really charged the little ones at all, but they, Stu in particular, were a little flighty the first few hours and at least I knew they wouldn't hurt themselves if they ran for the safety of their end of the run.  I also opened up the roof of the nest box on the little ones coop.  It was mainly so that when they went up there to hide, they would get some fresh air.  It turned out to have an unexpected benefit and the little ones now do laps of the run; perching on and then flying down from the nesting box, running back up the ramp and flying down again.  It also means that can perch at the same height but away from the big girls, which is a bonding process.

Tilda checking out the break in the "wall"
Need to work on some better chook proofing!
All in all, its been a real treat to watch them all just get used to each other.  There has been a tiny bit of huffing, but no attacks or damage done.  I was steeling myself up, especially after the hassle we had getting the four girls to coexist happily together, but the big girls have been extremely tolerant this time around.  Tiny is the only one that has thrown her weight about a bit, not a surprise as she is still the smallest hen in the flock and needs to stake her claim with the two newbies.  Given that the littleies are more than double her size, she is all mouth and little effect and it's best she gets it out of her system whilst they are still young enough not to realise that she's all bluster!  Grumpy Goldie, meanwhile, back in broody mode again, has yet to notice that anythings changed ;o)


It's really good to see them all hanging out together.  And my crazy, higgledy piggledy run working so well for them all.  It's grown as the girls needs have changed and I love the flexibility and adaptability of it.  I was a little worried that we might need to do something else to it; new additions to the flock have to date always created a new building project!  but as it turns out the only thing we need to do is finally sort out the netting, which was only ever a test run for what we planned to really do.  It's been so successful though that it's staying, we just need to redo it properly.  I also want to work out a way of being able to keep the nesting box roof open permanently in the day time; everyone seems to enjoy perching on it an then flying down into the run... I caught the big girls having a go this evening, it was like watching an elephant balance on a tightrope!

Wednesday, 12 June 2013

Lining a Ready Made Roman Blind with Blackout Fabric

Otherwise known as a really boring post ;o) 

Except that, when I was pondering this project and did a little googling, I couldn't find anything with specific instructions.  A few suggestions and "what ifs" but nothing that said "this works". 

Anyways, thanks to


and


this has been an increasingly necessary To Do.  Like most mutts, they are light sleepers and the blinds in our room are made from beautiful, light, linen blends.  As the days get longer, they wake up earlier and waking up earlier = get on the bed with Mum and Dad.  At the moment any time from 2.30am onwards seems to be fair game and we seem to spend more time lying in our bed sternly saying "Bed!" than we do sleeping.  Never mind the beautiful, soft light flitering through our light linen blends; blackout blinds were needed.

Adding blackout fabric to ready made Roman Blinds posed two issues: how you add the extra layer without completely dismantling the blind and what will that extra layer look like when the blinds are pulled up as blackout fabric can be very bulky.  I was lucky to find a lovely fabric, at a local store that specialises in upholstery fabrics, that is very lightly sprayed; just a hint of coating rather than the usual thick rubbery underside.  It's lighter and far more flexible than your usual lining.

Adding it to the blind proved far easier than I expected to; such a simple, if slightly dull, job!

So, this is how you do it, just as Montell would have sung.  Sorry, its been going round my head all day...

Take your blind down and pull the cords out of the rings, but leave them tied to the bottom one.
Lay the blind on the blackout fabric and cut the blackout fabric 2" larger all round.
Now lay the blackout on your blind, wrong side to wrong side (i.e. the rubber coated side to the side with the dowels and rings). 
Starting from the bottom of the blind tuck in the blackout lining and pin.  At each side, fold in the lining until you reach the first dowel.


When you get to the dowel, run your finger along the blackout fabric until you can feel the cord ring.  Taking a sharp pair of scissors, carefully make a SMALL cut in the fabric.  The size is important, if the cut is too big the rings will just slip through; it needs to be a bit of a struggle to get the ring through the slit in the fabric to ensure that it will stay put afterwards. One bonus of blackout fabric is that the cut won't tear any further and can take quite a bit of pressure as you push the ring through.  As this is the bottom run of rings, with the cord attached, you need to pull the cord through too.


Repeat this process all the way up the blind, rethreading the cords as you go and ending with a fold at the top of the blind.  I then slipstitched the  blackout fabric to the blind as I didn't want another visible seam line.  You could make this a no-sew project and velcro or bond the blackout to the blind.


And you have one lined blind and, for all my complaining, this blind (which is approx 80cm x 120cm) only took 40 minutes, from start to finish.


And here it is, back up in front of the window.  No longer see-through, tucking up nicely and I'm pleased with how nice the back looks.


The second blind is much bigger and Megs decided to help!


Finn, more sensibly, watched from a safe distance...


But, after a fair amount of grumbling about slipstitching and early mornings and annoying mutts, I was done and equally pleased with how good the blind looks.


And they work....


That faint slither of light is faked purely for something to look at in an otherwise very black photo ;o)  Even better, the dogs slept straight through to 6.20am this morning!  We'd have appreciated it more if we hadn't both been waking up constantly to admire the new darkness, wonder if the dogs were alright, wonder what the time was, admire the new darkness...  Hopefully, tonight, the novelty will have worn off a bit and we'll all sleep through!