Showing posts with label 1873 corset. Show all posts

Monday, 29 July 2013

The Corset... done!

It's been a funny old week, lots of stuff going on and nothing worth talking about... mainly just a blur of a poorly Finn, sleepless nights, general chaos and very confusing (just this unit please) homework.  In and amongst it all I found a little peace in finishing the corset - a task made all the more interesting by the fact that the foot pedal of my sewing machine has broken and stopping and starting it now needs to be done by unplugging the pedal and putting it back in again.  Very disconcerting, it made sewing a straight line almost impossible; a new pedal may be nearly £50 but it will be money well spent!

But enough, none of it is the point.  The point is the corset is complete, finally.  Complete. I'm going to savour the moment, it's been far too long a time in coming.


Yes, I need different coloured laces and further decoration is still to be sorted out, but I have a corset.  Phew.

Tuesday, 9 July 2013

Four days in stitches...

It started Friday...


God only knows where I'm going with this... that and the ever growing library of "oh I like that" pictures.  I have that many now, I could start a Pinterest board ;o)

Saturday:

Bottom edge binding and spiral bone sewn in.
Toying with more ideas...
Sunday:

It was definitely the right choice to get new eyelets.
and Monday:


It's been a very busy few days.  The 12yo was swimming in her Club Champs at various times from Friday night through to Sunday, there was a huge pile of logs to get stored away (more of that here), the usual housework to be caught up on and... and, we had to make the most of the sunshine and get a BBQ and some volunteer dog-walking (otherwise known as "auditioning for no.3!") in between :o)  There was time for sewing of an evening, but no photos and blogging.  The original, in hindsight rather ambitious, plan was to have the whole corset done; as it was, I was lucky to have got just the one side finished.  The hip shape is now exactly what I had hoped for and the inside looks far better than I thought it might! Now for the other side and then I can actually try this thing on... and I'm counting on that giving me a few more clues as to where to go next.

Wednesday, 3 July 2013

"Lining" the Corset, Pannier Hips and long Blue Wigs

My bits arrived from Vena Cava so I can push on with the corset again.  I'm really in the mood for a little handsewing of an evening so I've been looking forward to lining the corset seams with bias binding.  I'm trimming each seam to 3-4mm and then slip stitching the binding in place.  

Before, during and after.
It's a lovely clean finish, so clean in fact that when I proudly showed my two the results of my work, they didn't know what they should be looking at!  I also have my new eyelets and the spiral bones for the hips; it's all a little exciting.

I've also been a-googling and became very interested in pannier hips, particularly their reappearance in the 1920s which, until then, I had known nothing about.  I had started off on the Mermaid tail trail but the more I looked the less I liked.  Well, with the exception of this Steampunk costume which is kinda cool!


But, going back to my original costume, there wasn't a hint of Mermaid tail and the more I thought about making one, the more I felt like I don't want to turn this one into something so different.


I prefer hint 'o Mermaid and I like the idea of recreating my rather pitiful attempt all those years ago with my new and improved skills!  So, a little googling more, and I found this, this and this:


Lots of gorgeous pannier hips, Mermaid hips and everything.  To add to the general madness, I then found these.  Yep, can't go wrong with a little Miss Gomez!  It's the fringed skirt I love, it makes me think of seaweed.


I'm not sure how it all goes together yet but I'm already far more comfortable with it than I was the tail idea.  It sticks with my vintage vibe, includes trying something new and is far more "me" than any Mermaid tail would have been.

I've never been so confused by a costume before... there's a lot to be said for following a pattern!  It feels a whole lot messy most of the time, but I am also enjoying the randomness of it all; it's been giving me idea after idea, after idea.  It also prompted a rare moment of pre-planning and I ordered a wig.

Usually I'm so tied up in the costume that it comes to Halloween itself and I look blankly at my head and wonder what to do with it!  Last year's hairpiece was a very lucky last minute find.  Mermaid's, however, need Mermaid hair and I want no repeats of the shocking green nonsense I was so proud of on my first attempt.  I found a blue-grey wig quite by accident on Ebay and bought it before I could talk myself out of it.


Excusing the bags under my eyes and the rather goofy grin, I think I look good with a blue rinse ;o)  Now I need a big plastic crab or shell or something... every Mermaid needs a hairpiece!

Monday, 1 July 2013

Embroidering the 1873 Corset

In between other bits and pieces, and whilst I wait on my delivery of bones, bias and eyelets (the ones I had were too dark and so I have ordered silver ones to match the spoon buck), I decided to try some embroidery on the corset.  I chose the fan and cross designs, varying them to include a leaf stitch.  I have a number of embroidery threads in shades of grey, green and blue and and splitting them to make mixed colourways that match the various shades of the fabric.  


I've concentrated on the gussets and smaller bones in the front panels to start with.  The photos are taken with a flash to better show off the stitching.

In the meantime, I am doing some serious research on the bottom half of this outfit; it has become the thing I think about last thing at night and first thing in the morning.  I need to have a plan.

Monday, 17 June 2013

The 1873 Corset - inserting the spoon busk and finishing the second half

Saturday morning I mused about the possibility of new garden furniture and the lovely boyf booked a round of golf in for the afternoon (instead of Sunday).  Consequently, just as I was dropping him off, the heavens opened and I retreated home to sew: the second half of the corset was calling...
 
I rather love it when you done something once, the second half just flows.  The only possibly tricky bit was the other side of the spoon busk (easing the buttons though the fabric) but, thanks to the flexibility of the linen I'm using, that went without a hitch.  In fact, thanks to the timestamps on my photos, I know it took 9 minutes from the first photo to the last!  In contrast, on my first corset, made with cotton, the same process took nearly forty minutes.
 
The first step is to stitch and press the new fabric panel and then line it up with the first side of the busk.  Make sure that the seam edges fit neatly and snugly together and then mark the placement of each button.
 
One busk + one matching fabric panel, stitched and pressed


To make the button holes you need an awl and a sharp pencil.  The trick it to carefully separate the threads of the fabric and then create a hole that is big enough to ease the button through, but will not tear the fabric.  If the fabric remains intact it will remain strong and secure; tears will need to be repaired otherwise they gradually will weaken further as the corset is worn.  To make the hole first ease the awl in and gently wiggle it, to part the fabrics, until you have a hole the size of the base of the awl.


One small awl hole...

and one larger pencil hole.
One hole made and the trick is to then gently ease the button through.  The linen made it easy as it is so flexible but it is still so important to take your time and care with this stage as the hole will not be quite big enough and any forcing will cause the fabric to tear.  Once the button is through, gently push the threads back together, around its base, with the awl.


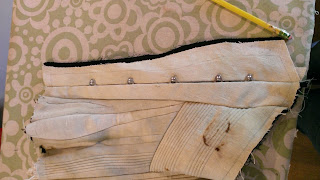
Et voila!  Five perfect button insertions, and a gratuitous glimpse of my gorgeous new slippers ;o)


And we have a corset...


We're getting there, slowly. There's still plenty to do: eyelets (I was too punch drunk to risk them on Saturday, they need a steadier mind and hand!), finishing the seams, hems (including the boning on the bottom ones), the emboidery and any decoration, but for now I shall just enjoy it being in one piece... and have a proper think about how the rest of this mermaid is now going to take shape.

Monday, 27 May 2013

The Corset - half done!

Out of paint and with not much else to do, I decided to put the next panel of the corset together.  That went pretty well and, though I was planning to call it a day, I then decided to "just try" the center back panel.  After that, with my little family all dozing on the sofa, it didn't take much self-persuasion to have a go at the center front panel, spoon busk and all.  I have half a corset sewn together!  Yes, there's a huge amount still to do, but finally, I have half a corset sewn together and it is looking good!

This is what started it all.  On the right is the second gusset piece that I stitched together last night.  I pinned and stitched the three pieces together.  The center and right hand pieces have a small spiral bone, the center piece bone slipped neatly in between the seams and the right hand bone I inserted into the piece and then ran a line of stitching down the outside edge to hold it in place.  I will finish the detailing on them later.


Once the top panels were finished, I added the bottom piece - my last set of measurements work very well.  This is the first time that the three top pieces have fit width wise across the bottom piece.


I sewed the new panel to the first and that is where I planned to leave it... the photo below captures the colours of the linen very well.


The back panel starts with a traditional seam; sewn in right sides together, pressed open and then folded over and pressed again.  The panel has a wide steel bone on the seam edge, a run of eyelets and a thinner bone on the other side of that.  I drew in the lines for each bone, measuring the width needed for the eyelets in between.  There will be 10 eyelets on each side, I will get the lovely boyf to help me put them in another day.


Finally, the front panel and the spoon busk.  As luck would have it, the side I was working on was the easier of the two.  The front and lining pieces are laid right side to right side and the busk laid on top.  I marked either side of the clasps and then sewed the seam in, stopping for each break and double stitching either side of it for strength.  One seam with five gaps to slip the busk clasps through.  Changing the sewing machine foot to a zipper foot, I then ran a line of stitching down the outer edge to hold the busk in place.


The center back and busk panels were then sewn to the the main panel piece (the busk to main panel was the single most nerve-wracking line of stitching I have sewn in a very long time!) and I was happily doing a silly dance or two around Miss G.  Oh, and taking lots of photos!  I am going to insert a spiral bone along the bottom seam too, to kick out and stiffen the shape at the hips.  I mocked it up with a spare spiral but will order two longer ones so that they will run from the busk to the back bones.


I just adore the shape of this corset and the hip in particular.  The texture of the cording and the weight are seductive.  I am seriously in love with this corset and can't wait to try it on... though there's a bit more of a wait before that happens, I shall have to be content to oogle it on Miss G instead ;o)

Related Posts Plugin for WordPress, Blogger...
© Lucy Green. Powered by Blogger.