Showing posts with label space mermaid. Show all posts

Tuesday, 29 October 2013

Selene... my nemesis... completed!

Halloween came a little early to our house this year and yes, I got the Mermaid costume finished, I was (finally) Selene for an evening.  

Reading back to my first thoughts on this year's project, all buzzing with inspiration and optimism, I honestly don't know whether to laugh or cry; I had such great plans and hopes and have found it, instead, to be deeply frustrating.  Giving up and starting again was exactly the right thing to have done, the wonderful Mrs B is a wise woman indeed!  It was a therapeutic and very satisfying experience and one that I found that I didn't want to blog about.  The majority of the dress is handstitched, curled up on the sofa with the boyf and the dogs, remembering, as I went along, little details about how I made the first dress and reminiscing about those first early days of falling in love with the Jedi.  It became a private process that I felt no desire to document.

That said, now that it's all done, I'm more happy to share the results and finish off Selene, once and for all! Starting off with my favourite picture of the evening, taken by Mrs S.  Blurry I know, but I love it.  It's us.


So, to start, my lovely little Starfish and Seashell tiara.  This was the second attempt as the mutts ate the first and I mean ate... demolished, destroyed.  It was touch and go as to whether I took them to the vets; happily, starfish, it seems, are not poisonous to dogs, nor bits of shell and silver plated wire... Even more happily, I had spares of everything and time in which to quickly wire them all back onto the headband.  It was a huge improvement on the bouncing silver stars I sported in 2006!


And then the dress itself.  A boned, empire line bodice attached to a gathered skirt, in the dark grey/blue sateen.  The bodice was of my own design (I may post the pattern later) and the skirt was based on the fantail skirt from the Victoria costume.  I shortened it to the point at the back of the knees where it is gathered and cut the front into a slightly deeper "V" that dropped from knee 3-4 inches.  Each panel of sateen was matched with a 1/2 as big again panel of a very soft net tulle which was gathered, stitched on and then treated as one piece.  In this way I was able to create the deep drapes and ruches without losing too much structure.  The bodice was attached to the skirt and the netting handstitched to it, first along the neckline and then gathered, vertically, along each seam of the bodice and stitched in place.  A zip was then handstitched in at the back.  The bodice is a far improved version of the original and inspired by a 50's prom dress that I have.  The front panel naturally fell into an attractive drape and so I left it as was.  The bottom, fishtail, of the skirt was a double layer of a pale blue chiffon under a iridescent, stiffer, dress net.  This was just over twice the width of the skirt hem, gathered and stitched in place.  The back half of the skirt was gathered at the back as per the fantail skirt pattern.

Green ceramic beads and silver and orange seed beads were stitched across the top of the bodice and at various points on the dress, with individual shells added in places and a rosette at the knee of sari fabric ribbon and a shell "corsage".  Again, a huge improvement on silver stars!


So that's it, before and after.  An although I have replaced my Jedi for a Vampire...


...it all worked out in the end ;o)

Sunday, 11 August 2013

Fabric for the Space Mermaid costume

I found Aladdin's Cave yesterday; a shop in a little village about 30 minutes away from me that stocks the best selection of sewing and crafting goods that I have seen in years... it will be dangerous, it's already dangerous, I don't have enough hours in the day for the ideas that it's given me!

As it was, I found a great selection of fabrics for the skirt of my mermaid costume, plus embroidery flosses, beads, pre-drilled decorative shells and the most amazing recycled, ribboned sari, that I just couldn't resist.  I've matched the skirt to the wig colour (far left).


The replacement foot for my sewing still has not arrived but I am working on the patterns for the pannier hips and skirt.  I feel like I'm finally over the hump on this project and actually have an idea of where it is going!

Monday, 29 July 2013

The Corset... done!

It's been a funny old week, lots of stuff going on and nothing worth talking about... mainly just a blur of a poorly Finn, sleepless nights, general chaos and very confusing (just this unit please) homework.  In and amongst it all I found a little peace in finishing the corset - a task made all the more interesting by the fact that the foot pedal of my sewing machine has broken and stopping and starting it now needs to be done by unplugging the pedal and putting it back in again.  Very disconcerting, it made sewing a straight line almost impossible; a new pedal may be nearly £50 but it will be money well spent!

But enough, none of it is the point.  The point is the corset is complete, finally.  Complete. I'm going to savour the moment, it's been far too long a time in coming.


Yes, I need different coloured laces and further decoration is still to be sorted out, but I have a corset.  Phew.

Tuesday, 9 July 2013

Four days in stitches...

It started Friday...


God only knows where I'm going with this... that and the ever growing library of "oh I like that" pictures.  I have that many now, I could start a Pinterest board ;o)

Saturday:

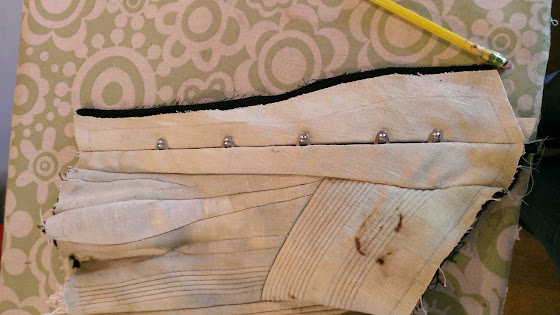
Bottom edge binding and spiral bone sewn in.
Toying with more ideas...
Sunday:

It was definitely the right choice to get new eyelets.
and Monday:


It's been a very busy few days.  The 12yo was swimming in her Club Champs at various times from Friday night through to Sunday, there was a huge pile of logs to get stored away (more of that here), the usual housework to be caught up on and... and, we had to make the most of the sunshine and get a BBQ and some volunteer dog-walking (otherwise known as "auditioning for no.3!") in between :o)  There was time for sewing of an evening, but no photos and blogging.  The original, in hindsight rather ambitious, plan was to have the whole corset done; as it was, I was lucky to have got just the one side finished.  The hip shape is now exactly what I had hoped for and the inside looks far better than I thought it might! Now for the other side and then I can actually try this thing on... and I'm counting on that giving me a few more clues as to where to go next.

Monday, 17 June 2013

The 1873 Corset - inserting the spoon busk and finishing the second half

Saturday morning I mused about the possibility of new garden furniture and the lovely boyf booked a round of golf in for the afternoon (instead of Sunday).  Consequently, just as I was dropping him off, the heavens opened and I retreated home to sew: the second half of the corset was calling...
 
I rather love it when you done something once, the second half just flows.  The only possibly tricky bit was the other side of the spoon busk (easing the buttons though the fabric) but, thanks to the flexibility of the linen I'm using, that went without a hitch.  In fact, thanks to the timestamps on my photos, I know it took 9 minutes from the first photo to the last!  In contrast, on my first corset, made with cotton, the same process took nearly forty minutes.
 
The first step is to stitch and press the new fabric panel and then line it up with the first side of the busk.  Make sure that the seam edges fit neatly and snugly together and then mark the placement of each button.
 
One busk + one matching fabric panel, stitched and pressed


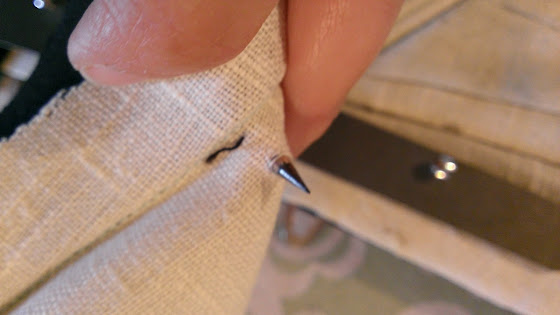
To make the button holes you need an awl and a sharp pencil.  The trick it to carefully separate the threads of the fabric and then create a hole that is big enough to ease the button through, but will not tear the fabric.  If the fabric remains intact it will remain strong and secure; tears will need to be repaired otherwise they gradually will weaken further as the corset is worn.  To make the hole first ease the awl in and gently wiggle it, to part the fabrics, until you have a hole the size of the base of the awl.


One small awl hole...

and one larger pencil hole.
One hole made and the trick is to then gently ease the button through.  The linen made it easy as it is so flexible but it is still so important to take your time and care with this stage as the hole will not be quite big enough and any forcing will cause the fabric to tear.  Once the button is through, gently push the threads back together, around its base, with the awl.


Et voila!  Five perfect button insertions, and a gratuitous glimpse of my gorgeous new slippers ;o)


And we have a corset...


We're getting there, slowly. There's still plenty to do: eyelets (I was too punch drunk to risk them on Saturday, they need a steadier mind and hand!), finishing the seams, hems (including the boning on the bottom ones), the emboidery and any decoration, but for now I shall just enjoy it being in one piece... and have a proper think about how the rest of this mermaid is now going to take shape.

Monday, 27 May 2013

The Corset - half done!

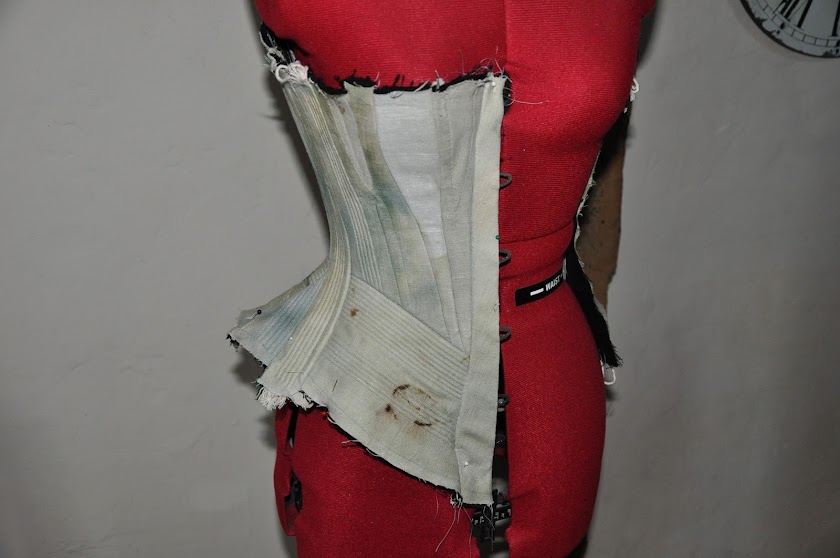
Out of paint and with not much else to do, I decided to put the next panel of the corset together.  That went pretty well and, though I was planning to call it a day, I then decided to "just try" the center back panel.  After that, with my little family all dozing on the sofa, it didn't take much self-persuasion to have a go at the center front panel, spoon busk and all.  I have half a corset sewn together!  Yes, there's a huge amount still to do, but finally, I have half a corset sewn together and it is looking good!

This is what started it all.  On the right is the second gusset piece that I stitched together last night.  I pinned and stitched the three pieces together.  The center and right hand pieces have a small spiral bone, the center piece bone slipped neatly in between the seams and the right hand bone I inserted into the piece and then ran a line of stitching down the outside edge to hold it in place.  I will finish the detailing on them later.


Once the top panels were finished, I added the bottom piece - my last set of measurements work very well.  This is the first time that the three top pieces have fit width wise across the bottom piece.


I sewed the new panel to the first and that is where I planned to leave it... the photo below captures the colours of the linen very well.


The back panel starts with a traditional seam; sewn in right sides together, pressed open and then folded over and pressed again.  The panel has a wide steel bone on the seam edge, a run of eyelets and a thinner bone on the other side of that.  I drew in the lines for each bone, measuring the width needed for the eyelets in between.  There will be 10 eyelets on each side, I will get the lovely boyf to help me put them in another day.


Finally, the front panel and the spoon busk.  As luck would have it, the side I was working on was the easier of the two.  The front and lining pieces are laid right side to right side and the busk laid on top.  I marked either side of the clasps and then sewed the seam in, stopping for each break and double stitching either side of it for strength.  One seam with five gaps to slip the busk clasps through.  Changing the sewing machine foot to a zipper foot, I then ran a line of stitching down the outer edge to hold the busk in place.


The center back and busk panels were then sewn to the the main panel piece (the busk to main panel was the single most nerve-wracking line of stitching I have sewn in a very long time!) and I was happily doing a silly dance or two around Miss G.  Oh, and taking lots of photos!  I am going to insert a spiral bone along the bottom seam too, to kick out and stiffen the shape at the hips.  I mocked it up with a spare spiral but will order two longer ones so that they will run from the busk to the back bones.


I just adore the shape of this corset and the hip in particular.  The texture of the cording and the weight are seductive.  I am seriously in love with this corset and can't wait to try it on... though there's a bit more of a wait before that happens, I shall have to be content to oogle it on Miss G instead ;o)

Related Posts Plugin for WordPress, Blogger...
© Lucy Green. Powered by Blogger.