Showing posts with label smock. Show all posts

Wednesday, 8 August 2012

The Elizabethan Smock, finished...

ok, ok technically I need to sew on a couple of ties but the big stuff... all done!  Little dance around the room.

I had time for one photo, one photo only, this morning and apologies for the odd Venus de Milo pose and grumpy face (it's too early in the morning) but, despite the appropriate underwear, it's such fine cotton that I wasn't entirely sure that I wouldn't end up embarrassed.  Though I realise, in retrospect, that I wouldn't have covered anything anyway!

The hem was hand sewn last night, I will put the ties on the cuffs (and ruffs if needs be) once I've decided on whether the ruffs will be tacked onto the cuffs (cuffs, ruffs, cuffs, ruffs.... I feel like I'm in a Dr. Seuss book!) or the inside of the oversleeve.  I am quite liking the idea of tacking the ruffs to the cuffs and then finishing the ruffs ("Green eggs and ham? I do not like them Sam-I-am") with some 3mm black ribbon and using that as the ties.  I thought it would be a lovely detail if it ran all the way round the join between the ruff and the bias binding and then extended into ties.

I can't believe that it's finally done (or that I've been rattling on about it since 17th May!) but it's done, done, done and in celebration, I'm starting on those oversleeves asap... it'll be lovely to have some colour back in my sewing, bring on the orange damask!

Tuesday, 7 August 2012

Cuff and Ruff, part 2


Sewing the bias binding onto the ruff was surprisingly fiddly, thanks to the variation in density between the cotton bias and the cotton lawn.  Even with an embroidery sharp, it took time and concentration.  I pressed the bias in half lengthwise and slipstitched it to each side individually.  The ruff is only 1/4" bigger than the cuff (oops!) and not as gathered as I had thought it would be. 


As I was finishing the ruffs, I was contemplating the use of hook and eyes and did a little googling.  In particular at photographs of the ladies' smock in the V&A collection, which clearly shows a thread tie looped through two eyelets.  I don't know if I'm brave enough to risk a handsewn eyelet yet, but I will forgo the hook & eye finish for a thread one.  Oh so slowly getting there.

Monday, 6 August 2012

Ruffs, then cuffs and back to ruffs!

Once again, and I am getting a little bored of this observation, I found myself flummoxed by Margo's instructions, this time to make the cuffs for the smock.  This was a good three weeks ago and it really left me in a huff!  The whole smock has felt like a battle, which is a shame as it is an integral part of the outfit and will be lovely when it's done.  Not having made cuffs before, I did some research on methods, none of which seemed to resemble the instructions that I had in front of me, and in the end decided to go it alone.  It's not that difficult after all, certainly a lot less fussy than what was being asked of me - and I just can't figure out why the extra fuss was called for.

In the interim I started on the ruffs, two long rectangles of cotton, joined with an inch long placket at the top, hemmed and gathered round the top.  The hems were two 3mm turns, far too delicate for machine sewing, so I hand stitched the lot.


Once the cuffs are complete I can bias bind the top edge (they have to be a 1/2" bigger than the cuff), add a hook and eye closure and they will be ready to tacked onto the cuff or the inside of the oversleeve, as and when I get that far!

So, onto the cuffs themselves.  I made a sandwich of a layer of interlining with two layers of cotton underneath, and stitched a 1/8" seam from the bottom of one short side, down the length of a long side (now the "top" of my cuff) and down the second short side.


The seams were trimmed to 3-4mm and the corners clipped across the diagonal. 


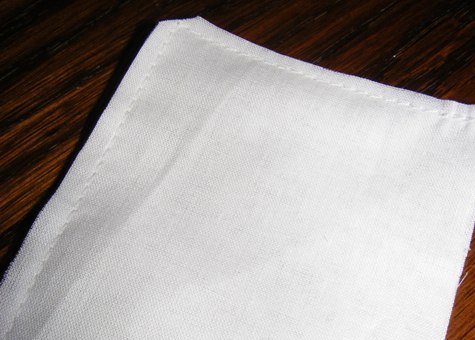
The cuff was then turned inside out, so that the interfacing was encased in between the two layers of cotton.  As the cotton is so fine, the layer that lay directly next to the interfacing was my "good", outer surface and the layer which had been turned over, my inside surface, as the trimmed edge is ever so slightly visible.  It is a snug fit, obviously I get a little give with the hook and eye, bit it looked rather like a bandage or a sweat band!


Moving onto the smock, I long stitched a double row of straight stitch around the bottom of the sleeve and gathered them to fit the cuff.


The bottom of the sleeve also had a placket (2" long) and the cuff was matched to it (right side to right side) and pinned in place.  Again it would have been a fiddly sew on the machine so I hand stitched the right side and interlining of the cuff to the sleeve a 1/4" from the outer edge.  Once done, I turned the cuff right side round and slip-stitched the inner layer of cotton in place.


One finished cuff... note the one!  I have more sewing to do tonight.  I'm pleased though, the gather is tight and very full, the depth of the cuff is nice too (deeper, I think, than the instructions would have but it feels good and sturdy!) and it looks the part. 


I hope, tonight, to get the other cuff and both ruffs finished off with a couple of pictures to update this tomorrow.  Then I just need to hem the smock and finally, finally!, it's done.

Tuesday, 24 July 2012

Seams, seams, seams...


I know, it's blue, I quite like the blue...


Phew!  They're all done, it's been a labour... of love? not so sure about that but very much worth the effort.  Cuffs and hem to go and I can get back to the fun stuff like the big oversleeves, I'm quite excited by the prospect of them :o)

Monday, 16 July 2012

A Smock Gusset, or two

Do you know how hard it is to sew with a dobe and a puppy on your lap?  No, well, it's not easy, and occasionally painful, and bad on the eyes, and causes the odd wonky stitch; but you all know that I wouldn't change it for anything.  I sit most nights now with my nose virtually in the armpit of my smock, trying to keep it away from fidgety on my lap, whilst the big fidget leans in from the side.  The dobe, whilst not doing my back much good with her 30kg+ of leaning at least knows to stay away from the fabric.  The Finn, he's yet to completely catch on!

So, the stitching goes slowly - I am actually debating sneaking off to my car during the lunch hour at work - but it's given me a chance to take some pictures of the underarm gussets.

The inside of the gusset, set into the top of the side seam and the corresponding sleeve seam.

The gusset from the outside.

And shown face on, it opens up the armpit quite a bit allowing a greater flow of air, the Tudor's answer to deodorant!

I have actually finished one thing; the shoulder seams.  I decided to use binding instead of simply turning them in: one, to strengthen them as they are so narrow and, two, in the hope that it will also help them stay put on my shoulders!  Handstiched to the edge, folded over and stitched in place along the shoulder/sleeve seam, they do feel a good deal more secure.  The front and back necklines I just turned and hemmed, the binding gave them a rigidity which, after some debate, I decided against.  The other necklines of the outfit are all so rigid, I liked that this one is a little softer, freer.

The shoulders, the edge finished with binding.

Sunday, 8 July 2012

The Elizabethan Smock, the hiatus is over

On my gravestone, they can write "She lived her life well, can someone now please do the ironing."  Never my most favourite of jobs (unless it is to press some sewing, then I'm a very happy ironer) it seems to have flourished since we came back from holiday, and the ironing pile had to be tackled so that I could get my dining room back, so that (more importantly) I could then turn it back into my sewing room... I have my priorities straight!

Finally today the ironing was done and I celebrated by getting the body of the smock sewn together.  It's interesting to make, with it's sleeve gussets and the flaired side panels but I didn't take photos.  I have to sew all the seams, so I may take some of it's construction then, but today I just wanted to see progress.  Instead I tried it on and the 11 yr old (who wants to be a photographer if the palaeontologist, make up artist, singer routes don't work out) took some photos.  The instructions say to check the fit of the neckline under the kirtle, and as I'd so drastically altered it (here), I was keen to see that I hadn't ruined it!


On it's own, it's not the most attractive thing!  The measurements are funny again and I'd argue, too small.  The side panels join at the base of the armholes and that width is very, very narrow.  I couldn't get the smock on my tailors dummy, it wouldn't go over Miss G's rigid shoulders, and even with the benefit of my more flexible shoulders, it's a squeeze to get in and out of it.


The sleeves are unfinished, they have a cuff and frill at the end.   They are long and very deep, the spare fabric will be pulled through slits in the over sleeves.


Although the shoulders will not stay on without the kirtle, it holds them in place nicely when on.  I'm also really pleased to have got the recommended 1" show above the kirtle bodice.  It also proves my thoughts about the original design, which would have left me with over 6" of smock showing above the kirtle.  I really must review the pattern and measurements at some point, if only for my own sanity!  I can't believe that it was meant to be as it was turning out before I made the amendments.


Which that brings me to the only problem with my adjustments... I cut the front and back panels to match, which was downright silly of me and I knew it at the time.  I was too impatient to wait for more fabric to be ordered/arrive and so uncertain about the whole thing that I wasn't sure I wouldn't be starting all over again anyway.  One day, I'll revisit the pattern again and see, with the benefit of a little experience, if I can't make the instructions work for me.  For now, I'm going to stick with this smock, as the back will be covered by the top gown... there's lots of seams to finish, cuffs and a hem to sew. 

Thursday, 14 June 2012

Houdini and the Gardener

The pups earned themselves new nicknames this week.  Megs, “The Gardener”, who did the exact opposite of what we would have imagined, when she found herself locked out of her kennel (thankfully during a rare break in the rain), and sunned herself in the garden instead of digging it up.  And Finn, “Houdini”, who proved his escape artist skills by unzipping his pen from the inside; much to the 10yr olds’ shock when she came home to find him mooching in the kitchen.  It should have been chaos, all flying soil and chewed up wires but it was all more than ok; they’d both been in unfamiliar situations and behaved exactly as we would hope; we could sit back and chuckle over a glass of red.

It certainly takes far longer to get back to normal following a holiday than ever you were on the holiday itself, and when you decide to throw a new puppy into the mix... we're all caught up in a heady mix of jet lag, puppy brain, broken nights' sleep (though he is very good, up at 4am for 5 minutes and we're tucked back in bed) and generally getting back into the swing of work, school and the everyday stuff.  It’s safe to say, that the ironing pile is going to grow by a few more feet yet before I get round to tackling it!

That said, as the boyf and I concluded tonight, with a certain degree of wonder, we are the most relaxed and happy we've been in ages.  The post holiday glow certainly hasn’t yet worn off, but it’s really rewarding to see our little pie-eyed “let’s get a puppy” plan come good.   I’ve talked before about the amount of time and research we put into our decision to get the Dobe and raise her right, and we have thought just as long and hard (if not more so, now that we had Megs to consider too) about how to expand out little pack.  I know that it’s very early days yet, but we are enjoying the calm that comes with the certainly to knowing what we’re doing this time round!  Finn is fitting so well into our life and he's such a happy go lucky little thing.  There’s no doubt we have our work cut out for us, but its good beginnings.

And amidst all this loved-upness, I took a look at my smock, in the hope that I can get back to some sewing this weekend... I have the dining table to clear of that ironing first though!  It felt unfamiliar and exciting all at the same time but I’m itching to get back to it again, I’m not me if I’ve not been sewing for a while.

Thursday, 17 May 2012

Starting the Smock

The lovely Mr S and I walked the dobe this afternoon, as they were spraying the crops in High Field.  We stayed well clear but, by 5 o'clock, were nursing headaches and trying not to fall asleep on the sofa.  My plans to make my Elizabethan smock seemed to be disappearing fast.  So, after a shower, dinner and restorative glass of red, I decided that it was time to do something.  Perhaps not the best idea in the world...

I had cut the pieces for the smock out a few days ago.  The first step was to sew the neck lining to the main panel.  Instantly it was obvious that it was too small.  The smock is supposed to just be visible above the neckline of kirtle; the manual says that sometimes they would go as far as two inches above the neckline, for modesty or decorative purposes. I'm sorry but, at the risk of ruining whatever reputation I may or may not have, I am not that modest!  Or that keen on giant bands of decoration.  I have no idea how the pattern was supposed to work; I checked it twice, plus the instructions for how to get the measurement and gave up trying to figure it out.  The neckline just had to be adjusted.


Proof that it's probably best not to sew when frustrated, headachey, tired and a half a glass of wine better off,  I trimmed the neckline to within half an inch of the outside edge of the lining... all the way around!  Oops, I should have only needed to do the neck and back edges, not the sleeves!


But I like the shape, and I'm feeling stubborn.  I decided to at least get the side gores and a sleeve in to see if it was even possible to continue.  If not, whilst I sit by the pool in Florida next week, I could have some more cotton lawn being delivered in the post.  The instructions for fitting the sleeves are "light" to say the least.  I discarded them, I can see the final shape that I'm going for, so decided to do my own thing and then fit it to Miss G instead.


You can see the faint line of the corset underneath.  I think that the smock neckline may still be a little too high, though there will be some room for manoeuvre on me (Miss G's bust to shoulder measurement is a little longer than mine).  I know, finally, when I'm done so I'm quitting for tonight; but I'm going to persevere and get at least one sleeve sewn in as finished; try it on with everything else, for a proper fitting and see what's what.  Here's hoping my rather grumpy gamble pays off! 
Related Posts Plugin for WordPress, Blogger...
© Lucy Green. Powered by Blogger.