Tuesday, 28 February 2012

An Elizabethan (not-) Farthingale, finished

Well, it may not be a farthingale as you'd expect it, but it was a great experience being able to make Alcega's pattern four centuries later.  As I was feeling rather guilty about the lack of boning I decided to handstitch the rest of the of it; from the 4mm gathers at the waist...


to the closure at the back...


the four metre hem, this took nearly 5 hours last Sunday afternoon, and the waistband, with inch wide gosgrain ribbon ties (to match the bumroll).


If I do wear it as part of the outfit, I will wear it under the corset and bumroll but I couldn't resist trying it on over the bumroll again; I just love the shape it creates! 

Sunday, 26 February 2012

Homemade Dog Biscuits

One of the more interesting debates amongst vegans and vegetarians is what to feed our pets (never mind the whether we should have pets debates!)

I have vegan friends who feed their pets a vegan diet; I appreciate and admire their commitment.  Megs, however, has a meat filled diet and I have no plans to change it.  For me, the issue is made a non-issue by two things; her heath and her choice.  We nearly lost Megs a couple of times, as a puppy, to a series of bladder and stomach based infections.  Research afterwards pointed to a BARF diet as being her best option to keep them from recurring.  Megs is a carnivore's carnivore; her whole existence revolves around meat and bones and more meat and more bones.  I am fairly certain that I could put her on a vegan diet (she loves lettuce and my homemade tofu dog biscuits) but I am equally certain that she wouldn't be as happy or that if a piece of meat were to be put down as an alternative option, she wouldn't go for that first time, every time.  The only happy alternative for my dog would be the pizza crust diet!

Given a choice, Megs would eat meat; and I'm a stickler for choice.  I've made my choice, it is informed and I know and have weighed up the pros and cons.  I have that capacity, Megs does not and so when I make a choice for her, I have to do so based on what I think is best, and most satisfying, for her; not what I my ethics would prefer.  In just the same way, we feed her very well; locally sourced products where we trust the product and natural treats.  Just as I wouldn't feed a child junk food every day, I don't feed my dog overly processed crap in a bag.

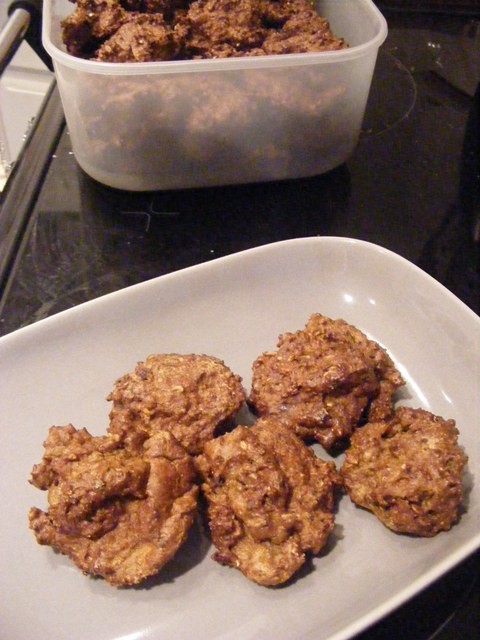
So, thanks to my freezer defrosting itself, on another lovely early spring day with all the kitchen windows wide open and a restorative cider in hand, I found myself knee deep (or so it felt) in defrosted liver!  On it's own, Megs is not too keen; in biscuits, she loves it.  This is more a "by eye" recipe than a measured one, the end result will always be appreciated!  I had approx 900g of liver to use and made generous dollop biscuits; I can no longer stand to handle liver so wimp out and use a couple of spoons rather than roll and shape the dough as I used to.  With dollops ranging from the very-generous-keep-her-busy-for-5-minutes to pocket treats, this amount made 65 biscuits; with the amounts given below, rolled and shaped, I could get approx 30 1.5" diameter circular biscuits.

Liver and Herb Biscuits.
My poor dollops, they don't look pretty, do they!

300g liver
300g wholemeal flour (I use Allisons Wholemeal with Seeds and Grain)
1 tbsp EVOO or sunflower oil
1 egg (beaten and poured in slowly, you may not need all)
1 tbsp dried parsley
1/2 tbsp dried oregano

Preheat the oven to 180C.

Put the liver in a bowl and, with a handheld blender, blend till smooth; you will miss bits, but don't worry, they add a little extra texture to the finished product!  Add the herbs and flour and mix loosely together.  Add the oil and the egg (I combine them first) a little at a time, until the mixture has formed into a loose dough.  It shouldn't be dry or the biscuits will split/crumble in the oven but if it's too wet it will be hard to work with. A texture similar to a pizza or bread dough is best.  If it is too wet add a little more flour.

If cheating, like me, dollop your biscuits onto a greased baking sheet, or roll out the dough on a lightly floured surface to approx 8 mm thick and cut shapes out.

Bake in the oven for 30 minutes, then turn the oven off and leave the biscuits in there overnight to harden.  Once finished, store in an airtight container and, if they last that long!, they should be good for 3 weeks.

PS Having now fed the dobe a few, she loves them I am pleased to say, these biscuits are as hard as I hoped they would be and actually require some chewing!  My dollops are, in some biscuits, over an inch thick and for smaller dogs or older dogs, I would definitely roll the dough out or shape them into small, thin sausages.


Saturday, 25 February 2012

Warm Mushroom and Parsnip Salad

This is a combination of some of my favourite Hugh F-W recipes and a couple of my own favourite things.  The boy-f told me last night that I should start a restaurant on the basis of this salad... bless his kindness, but it would be a very limited menu!

Warm Mushroom and Parsnip Salad.

Serves 2 main portions.

Salad:
200g Chestnut Mushrooms
2-3 large or 4-5 medium/small Parsnips
Rocket, watercress and baby spinach leaves, 2-3 good handfulls per serving.
100g Blue Stilton (optional)
50g Pine Nuts
EVOO
Salt and Pepper
Good knob of soya margarine.

Dressing:
1/2 tsp Dijon Mustard
1tbsp Balsamic Vinegar
3tbsp EVOO

Warm the oven to 200C.  Peel and trim the parsnips.  Halve and quarter them into 4cm chunks.  Toss them in EVOO, lightly, just to cover and season.  Put in a tray and into the oven for 40 minutes, turning 2 or 3 times during their cooking.

Dice the stilton (if being used) into 1 cm chunks and place in a serving bowl with the pine nuts.  Layer the salad leaves on top and set aside.

Mix the dressing ingredients together and stir very well, set aside.

As the parsnips are nearing the end of their cooking, approx. 15 minutes from the end, cut the mushrooms into three thick slices and fry for 5-10 minutes in a tbsp of EVOO, a good knob of margarine and seasoned lightly with salt and pepper

Once the mushrooms have been cooked, lift out of the pan, add the parsnips and set aside to cool slightly. .

Once cooled mix the mushrooms and parsnips with the rest of the salad and dress.

I serve it a with sweet tomato and pesto flatbread.

Saturday, 18 February 2012

Its a 1000 piece jigsaw!

Behind the scenes of the occasional blog post, this project is starting to feel like a 1000 piece jigsaw without a picture.  Ok, maybe 1000 pieces is a bit of an exaggeration, but you get my drift.

It is a problem entirely of my own making in that I started with an end result firmly in mind, rather than looking at what was available, and have been working backwards to find the individual parts to suit.

This approach worked fine with the Victorian Costume.  Although a fair amount of research was required there was a wealth of information available, including contemporary patterns, resources and clothes.  Modern, redrafted patterns are plentiful and once I had identified a style and it's era, it was simply a matter of selecting the various elements to piece the outfit together.  It was a 250 piece jigsaw with a good picture;  some complexity, a few bumps in the road, but the end result was identifiable from the start.

Go back another 300 odd years, and whilst there is a surprisingly good body of primary sources available in the form of written documents and artwork; the main narrative feels like it is missing.  There is so much that is different between the Tudors and ourselves; even down to the way we think about our clothes.  I think that they would have been deeply disappointed with our throw away tendencies and our lack of care and attention to our clothes; even the simplest clothes then are a work of art by our standards today in terms of detail and construction.  Interpreting and deciphering the very few pieces of clothing still existing, the fabrics, the manufacture, the language of their documents and patterns, even the measurements that they used... it is a skilled piece of detective work requiring great skill and dedication.  Luckily, for amateurs like me, there are great resources; the work of Janet Arnold, books like the Tudor Tailor, websites and tutorials written by other keen recreationists.  But, in comparison to the Victorian era, the information available is far smaller and focused.  Back to my jigsaw, it feels like a picture with big chunks blacked out.. and I'm a whole picture kinda gal.

Take the painting of a young Queen Elizabeth I that I posted at the start of this project.  My initial thoughts were no more complicated than "I want to make this", but as you read, you learn; as you learn, you study and dissect and, as you dissect, the whole process becomes a little more complicated!  Now I think more like this:

- The sleeve and neckline I have patterns for.
- A kirtle too, but there are a variety of kirtle patterns, which does I choose? Which would support the rest of the outfit best?  Boned or not?  If boned, how so?
- I have made a corset and a bumroll, based on my initial research and enthusiasm!, but does she actually wear either?  She is 13 in this picture, therefore I would say is probably not wearing a corset, rather a boned kirtle or placard, if anything at all.  There is a hint of bosom too; does this mean there is no boning at all and a buckram lining instead?
- Is she wearing a bumroll?  you can't see, but following the line of the skirt below the right hand sleeve, it could stand proud of her back, so possibly.
- Initially I was certain that she is wearing a farthingale.  The Alcega pattern dates from 1589 and the Tudor Tailor Henrician costume uses a bumroll to create a softer but similar shape, if her dress had been arranged for the portrait? Suddenly the question is whether farthingales were worn in 1546; back to Google and yes, she undoubtably is, farthingales having been available from 1545 and quickly became fashionable.
- And then there is the bodice.  Not one of the patterns that I have for this era show a bodice like it.  They have defined, gathered waists with a slight "v" shaped placard (stomacher) attached to the front of the bodice.  Later Elizabethan patterns have stomachers shaped more like this, but they are from the French farthingale era and so the entire dress shape is very different.  The Tudor Tailor taught me that Tudor and Elizabethan portraits contain a wealth of detail and it is possible to see even pinnings (closures) shown.  Zooming in on the right of this portrait it is indeed possible to see a join at the side of the bodice.  Faint, but there.  So is the bodice a shaped placard?  It seems reasonable to think so.  I have no pattern like this, so to recreate this I would need to adapt one.  But how does it work with the rest of the gown?  If it attaches at the sides of the bodice, as the placards I've patterns for do, how does it (does it?) attach to the skirt?  How does it retain it's shape?  Boning is most probably surely? Does the sharp shading indicate boning?  If so, the boning sits below the bosom?

You see, the questions could be endless.  Or maybe, just maybe, the boyf is right and I think too much!

It is leading me to two conclusions: one, you pick a pattern and you make it, learning as much or as little as you want in the procees; or two, you find something beautiful, want to recreate it faithfully and take the necessary, educated leap of faith.  I know that I don't want to do one, but am I ready for two?

All this reading and Googling and looking at images raises another problem, I've found other dresses that I like better!  Particularly when looking at other people's modern dresses, where you can see the drape and fall of a gown made from modern materials, the way it moves with them.  I am now far more drawn to 1530s dresses, not 1550s onwards as I originally planned.  I love the Hans Holbein portrait of an Unknown Lady c.1535 (left).  There is also a family portrait of Henry VIII, Jane Seymour, Prince Edward and the Princesses Mary and Elizabeth at Hampton Court that I also like.  Painted in 1545 (ish) it is an imagination of the happy family that many think Henry had always wanted. Jane Seymour died in 1537 and Elizabeth was born in 1533 so there is a fair amount of artistic license.  However, the outfits worn are of the earlier period, and whilst I am not as fond of the colours of Mary and Elizabeth's gowns, the shape is lovely and fulfils my desire for a costume with a flat bodice, fabulous sleeves and long full skirt with train (below).

As I learn more, put the pieces together a little better, this project feels like it's always turning on it's head.  It's the first time in a long time that I've started with a project and found myself frequently having to go right back to the beginning and start again.

This brings me back to my farthingale.  I don't think it's right for me or this project.  It was a pleasure to make the Alcega pattern and I am going to finish it.  I just won't be boning it, not yet anyway.  I can wear it as another petticoat, or may look at how it works with the kirtle patterns that I have, it may be adaptable.  If all else fails, it can wait it's turn; I may one day want to revisit the 1550s.

So, the Elizabethan project is still the Elizabethan project, just a revised version; my Elizabeth is getting younger.  I would still love to make the dress that I originally wanted to make, but I don't feel that I know enough about how to to do a decent job.  The best way to truly learn is to make something and by going back 20 years I have access to well documented patterns and all the help that I could ask for.

Now to pick the pattern, once and for all, just pick the darn pattern!


Thursday, 16 February 2012

The Tudor Lady's Wardrobe


Once in a blue moon the simplest things can be a wonderful surprise, and so it was when I spoke to Paul of Paul Meekins Military and History Books.  I don't know what I expected when I called, but I certainly didn't expect the immediate connection, the easy camaraderie, the utter pleasantness of the few minutes that I spent placing my order for his final copy of Margo Anderson's The Tudor Lady's Wardrobe.  I thoroughly enjoyed my long-distance purchase and it's such a rarity to be able to say that!

And so, as promised, I got my copy of the patterns in the post this afternoon and have been happily browing.  Of note is the 100 page guide, which is essentially a pictorial instruction manual with detailed notes about fabrics, trims and construction methods.  With time and care, almost any level of sewer could make an outfit following these instructions; they are extraordinary in their detail.

On a side note, I have returned the narrow gauge hooping; I could carry on as planned but my gut says that it would be a waste.  Also, with the benefit of a couple more days looking at it, I can't help but be concerned about it's size...  a 4m circumference makes it pretty interesting trying to move about my little cottage!  Back to the drawing board and some more research on the Alcega Farthingale I think.
Related Posts Plugin for WordPress, Blogger...
© Lucy Green. Powered by Blogger.