Sunday, 12 June 2011

Making the Fantail skirt... part one

A rather bleak and rain-filled Sunday afternoon seemed the perfect time to finally start the Fantail skirt.  I have chosen the full design, with a train.


Having cut the pieces, I pinned the each fantail to a back piece and sewed in place with a 1/2 inch seam.


Once sewn, I joined them together and sewed the full back seam, starting 8" down from the waistband (for the placket) and paying close attention at the point at which the top of the fantail was sewn in.

I am in many ways a lazy sewer - I don't mark notches, where a pin will do! - and could be accused of rushing, but this pattern is a dream to work with and in less than an hour after cutting out the pieces I was looking at the fantail of my skirt.  It came together so quickly, it was very tempting to just keep going...

but I want to be able to bore my grandchildren showing them this skirt! and so the placket and seams are folded and sewn in, I do love this finish.

In my aim to use as much as I can from my current stash, I chose a black satin bias binding for the ties which will be used to create the gathered point at the back of the dress.

and gold Christmas ribbon!  Not an entirely daft choice, it doesn't twist under the binding and has a slightly rough texture, which holds the gather well.  Once the skirt is finished, I don't plan to leave the ribbons adjustable; they will be trimmed and the bias sewn closed to prevent further fraying; no one but me (and you!) will know of my Christmas ribbons.  To pull the ribbon through the binding, I attached it to a wooden skewer, far easier to use than a needle.

And, I have a gather!  The illustration on the pattern shows a double gather, which I prefer...

and so I sewed a second layer of bias 3" above the first.

Moving to the front pieces, I sewed in the pleats; laziness again, I just pin, press and trust my straight-eye!


Pinned the two side panels to the front, and sewed them in place. 

I finished the seams and decided to call it a day; but couldn't resist quickly pinning it onto Miss G for a sneaky peak of what the final skirt will look like.

As a footnote: after a bit of thought, Miss G is permanently clad in corset and chemise and the rest of the costume made to follow those measurements.  The patterns, I presume, work from standard measurements, whereas with the corset and chemise on, my measurements are in places quite different.  I am, therefore, working to those measurements instead.

Thursday, 9 June 2011

A culinary diversion!

Anyone who knows me well knows that I love to cook, but not only that, I am passionate about the food that we eat.  I buy organic, fairtrade, ethical, local, I want to know where my food has come from and how it got to my plate; not always possible, or easy, but I care to try to find out.

And so I have watched with interest a good friend's near instant conversion to a vegan diet (see  http.cookingwithleyla.blogspot.com) and the recipes that she has posted.  As part of her process she watched Earthlings, a profound movie that I am still struggling my way through.  As with all arguments made to have the strongest impact some of the detail is truly horrifying, but it was in some of the "quieter" details that I think I found myself most shocked by.  It has left me greatly ashamed of the cruelty that we humans are capable of and mindful of the fact that the vast majority of people have no idea of the cruelty being perpetuated in their name; for their much-loved pets, food, clothing, medicine and entertainment.  We may know the odd detail, hear the odd story, see the odd picture, but we do not have the full transparency that allows us to make truly informed and conscious choices.  I can only hope that we would choose differently we truly knew.

Added to that the information that I learnt about how meat production impacts global hunger and I came away determined to set myself a culinary challenge, for just a week to start with, and eat even more consciously that I have done before.  So I made a deal with the boyf and the 9 yr old; if I could, at our local supermarket, stock our larder to live predominantly vegan/vegetarian for a week, they would be up to the challenge of trying some meat free eating.  I was going to go predominantly vegan for the week and only vegetarian if I had to.

If I am brutally honest, I can not imagine a meat-free future for myself.  This was more an intellectual challenge and a chance to cook differently again and expand my culinary horizons.  I was also very interested by people's reactions; vegetarian... a slight mutter; VEGAN... well, I think a good majority of the folk I know think that I have gone just plain crazy!

But it has been extremely easy, I don't miss meat, I have loved the cooking - which is quite a different experience - and the experimenting.  I feel far more in tune with what I am making, willing to try flavours and marry new ideas together.  And, most amazingly of all, I feel at peace with what I eat.  I don't think about what I'm making or eating in the same way that I did, I don't worry about the fat-salt-blah-blah-blah content, I don't wonder where is came from and if it really is local, free-range, ethical as it says it is (don't get me started on packaging and labelling!)  I just cook, eat, and enjoy!

And to those of you that would argue that I think too much... I say that you don't think enough!  We all have the choice to make our own path, but we have the responsibility to do it in the best way that we can, not only for ourselves but for our health and our children and our place on this planet.  If we all truly believed that we should leave this planet in some way better than we found it, we would all be living in a far better state right now.  So we can start with what we put in our bodies, the sustenance that enables everything else we do... go learn, go think, go experiment and I dare you not to, in just the teeny tiniest way, like it!

Sunday, 5 June 2011

TV225... the start of a Fantail Skirt

I have my fabulous fabric, have thrifted together the other pieces I need (bias binding, ribbon for ties etc.) from my stash and having looked at everything for at least two weeks now, I am finally ready to make one Victorian Fantail skirt :)

One stumbling block was that my measurements fell exactly between too sizes; another was that the pattern would need to be lengthened.  Both minor, minor details, I know!; but when preparing to cut your New York bought material, with no hope of getting more should you make a mistake... well, my brain needed to procrastinate!

So, all sorted.  I did not want to cut the original patterns and have instead spent a happy evening sellotaping together some sheets of tracing paper (with the sellotape that the Dobe hadn't managed to chew through, she does so love to help!) and cutting out my new, longer pattern pieces...

Saturday, 4 June 2011

Halloween Invitations.. made and in the post

Halloween this year is going to be special.  Fancy dress as ever, but a small gathering rather than a large party.  It's based on dinner nights that the boyf and I started hosting just after we met, the Grahame & Green dinners, a chance for us to flex our culinary muscles and host a perfectly planned evening with lots of lovely touches.  We've not had a G&G for ages and so this seemed like the perfect opportunity to flex our rusty cooking muscles!

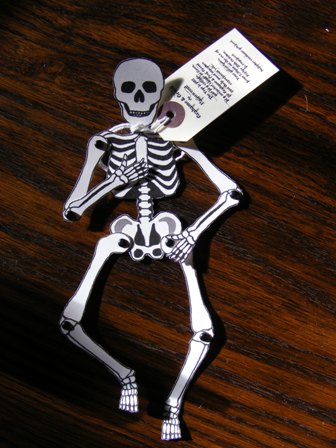
The invitations needed to be sent out early, to guarantee numbers and let me tie up a few more details too ;o) and so they had to be good and memorable.  As my Victorian costume is for Halloween we were looking at a period themed party, but I wanted to give people options as well so it could just as easily be Frankensteinian or a little Rocky Horror.  I also wanted to use skeletons as my main motif this year.  So, I decided on little skeleton messengers, posted in their own coffin... Gothic but not too scary!

The skeleton I found on Ben & Jerry's website (they're not only good for ice-cream!) and printed him off onto  sheets of thick white card.  Ignoring the ice-cream toting limbs (sorry B&J) I cut out the skeletons and joined their limbs with 4.5mm black round head brads.

The wording for the invitation was printed on to mini luggage tags and tied around the skeleton's necks.  To put the text onto the tags I printed it onto clear labels, deconstructed the tags, stuck the labels on each side of tag, trimmed them, repunched the holes and then put the tags back together again, gluing on the hole reinforcers and retreading the ties.


I won't say it wasn't a lot of work, but they are worth it!  The font, Bleeding Cowboys, is wonderful and reads so well, even at 6pt.


The text reads:
Grahame & Green do Halloween! 
The Year is 1882 and in a cottage, in a secluded village in Essex, 
Dr Grahame & Prof. Green plot their most macabre experiment yet... 
 Your attendance, from 7.30pm on the eve of Friday 28th October, is required. 
Suitable costume advised.

The scene is set....

I then moved onto the coffins.  Tracing a basic shape from a book, I made three templates; the base, the lid and the lining.  You can download the template here; print at 100% on A4 paper.  The base is 10mm deep, the lid is 3-4mm longer and wider than the base and 5mm deep, the lining is 2mm shorter and narrower than the base.


As I wanted black coffins, I couldn't print the template onto the card so I traced it instead.  I used an awl to pin prick each point in the card and then joined the dots to redraw each piece.


Once cut out, I folded each line against the ruler for a smooth, sharp crease, and glued the tabs.  I decided to line each coffin in a fabulous corrugated red card that I found.  I cut lengths 8mm wide trimmed them to length (the circumference of the internal measurement of the coffin) and glued them in place.  I then glued in the inner lining.  The lids, at 5mm deep, I decided were too narrow to line.  I had originally wanted to use double-sided tape but was not having any luck; the shapes would start to come apart.  I then I found an old pot of craft glue in the garage; thank goodness for fast-drying craft glue! 


Finally I found/Photoshoped a variety of luggage labels and stickers, and a stamp.  I printed them onto some white labels, cut them out and decorated the coffin; this is a well-travelled skeleton!


I hand-wrote the names on and packaged the coffin up in a length of red embroidery thread.  
All ready to go...

Materials:
A4 card (120gms or more, depending on your printer) in White
A4 card (heavyweight) in black and red (corrugated or textured if possible)
Luggage tags
Avery Labels in clear and white
4.5mm round head black brads (8 per skeleton)
Red embroidery thread or string
Good Craft Glue
Scissors, ruler, awl or sharp pencil, pencil, black pen, hole punch

Friday, 3 June 2011

The joy of hello...

the boyf and I will occasionally get on the back of his bike and roar around the countryside enjoying the sun and fresh air.  I love the freedom of being sat on a bike, the thrill of the ride, the camaraderie of being part of the "clan".  I love that bikers say hello as they pass each other, that little tilt of your head to the right, the simple pleasure of a shared acknowledgement.

And so it is, with the purchase of my Smart car, I've joined another clan.  Its taken me a little while, first to notice (!) and second to join in.  But, tonight, there it was, the little lift of your fingers from the steering wheel, the mirrored response, the happiness to be had in a tiny bond forged with a stranger.

We humans are needy folk!  At its worst, it can cause great problems; at its best, it is a series of tiny steps that make us all a little happier and bring us all closer to a shared humanity.
Related Posts Plugin for WordPress, Blogger...
© Lucy Green. Powered by Blogger.