Tuesday 30 April 2013

Our new feathered girls...

The other excitement of Sunday, was the arrival of our new girls... a post-swim treat for both of us!  Yes, going from one back to four chooks was a bit of a palaver (and yes, I know I'm downplaying it rather a lot too...) but ever since they settled I have been thinking that six would be a good number.  It's not completely without reason, my oldest girl, Etta, is absolutely and magnificently in her prime, but she's coming up for 5 and, should anything happen, we would be left with Tilda the Bossy and the two little girls.  Spreading out the flock a little more would give us all a little leeway if anything untoward should happen.

Keeping with the mix and match nature of our little flock and at the mercy of the 11 yr old, who had complete voting rights as a treat for her swimming prowess, we went for two new breeds: a Sicilian Buttercup and a Crested Cream Legbar.  The Sicilian, "Silli", is an extremely rare breed who will grow into a smaller sized large fowl and has a temperament to match Tiny the Game Hen.  The Legbar, "Macy Gray" (you'll see why!) is a beautiful, blue-egg laying, little girl.  Both girls are 11 weeks old, much younger than we've had before, but that too was deliberate as Goldie is broody at the moment and could use someone to mother!

Initial introductions went well, though the littlies are separated from the bigger girls for now as they eat different food and need to settle, bond and grow a little before I integrate them completely.  There was some of the usual argy-bargy but mostly just a lot of squawking. Megs was beside herself, desperate to say a proper hello to the newbies and restore order with everyone else.  The rest of the afternoon was spent drinking tea, calming Megs and chook watching in the sunshine... wishing we had ear plugs :o)  

So here's everybody...

Etta, our Grande Dame
Tilda, the Bossy
Gorgeous, Grumpy Goldie
Timy Tempah aka Terror now that someone smaller than her has appeared!
Silli Buttercup, not the most flattering photo but too cute not to post!
And last, but not least, the beautiful Macy Gray... she sings too!
I know we're biased, but aren't they a gorgeous bunch?!  I do love my chooks.  I am so looking forward to the experience of caring for these new little girls and seeing them grow and bond with the older girls.

Swimathon 2013, in aid of Marie Curie

This post is a little late, too much excitement on Sunday and the lovely boyf came home yesterday... but the 11 yr old made me a very, very proud mama on Sunday.  As part of Girl's Week (with the boyf in Boston) I signed her up, the weekend before, for the Swimathon - thinking that it would be a bit of fun.  A certain amount of horror set in, as I officially registered her, when I discovered that the Swimathon was a 1.5km (or 60 lengths) swim! Option A was just not to show up... not an option really; and Option B was to sign her up and make the first, guilt-ridden!, donation.  Option B it was.  Now, 60 lengths wasn't completely out of the realms of possibility, she swims in a squad and an average session includes 30-40 lengths, but I was fully expecting a lot of cajoling and threats to get her through the last few.  I even roped in the lovely Mrs B, as volunteer counter, for moral support (mine, not the 11 yr old's!)  

As it is, my fabulous daughter (and all the other great children who took part that day) proved us wrong, and then some!  There was a certain mental block with the initial 60 lengths, they would pause for a drink, ask for their total thus far etc. but they didn't slack; 60 lengths were done in little over half an hour.  And then a little magic happened, their swim coach said to let the keep swimming till the end of the hour and swim they did.  In the last 20 minutes, the 11yr old swam a further 22 lengths.  She had hit her stride and didn't stop. Their tenacity and determination was just a delight to watch; and a reminder of how we so often underestimate our children. 


And just look at that face, her only disappointment that she didn't have time to get to 90 lengths.  I think she could have happily carried on to 120 if we'd let her!  There is so much time spent, being a parent, where you are caught up in the day to day minutiae of doing you job.  You love your child, of that there is no doubt, but you are so busy thinking of this, that and the other, that you forget the marvel of them.

And on Sunday I got to marvel, buckets and buckets of marvelling... one proud, proud mama!

Friday 26 April 2013

Corset, corset, corset...

It's been a long week, mainly of my own making with the late nights studying, and I am determined to relax and get an early night tonight, but I couldn't resist a bit more work on the corset.  One thing I wanted to do was to check the new bones and whether they are a good fit, and the other thing was to move onto the side panels which run down the centre of the hip panels that I have made.  It is the first combination of cording and spiral boning and I was keen to see how that worked.  I am a  little in love with spiral boning by the way, I just love the flexibility of it, it makes me want to just keep testing all the things it could do!

So, a quick look at the bones, I think they'll be fine.  In some respects, they will have to be as they are the narrowest width that I can get, but the widths I think will work well with the width of the pieces.  The seams themselves will hold the bones in snugly enough and I can decoratively stitch them in place at the top.  Well, that's the plan at least!


On to the side panels.  Laying the bones in place I marked the channel for the bones on either edge of the panel.


Then, as the gap between the bone channels was quite narrow, I marked in the lines for the cording.  Not my best thought, more later...


Sewn in, with the cording and bones in place, the cording did not work.  Never mind that it was wonky, the channels were too big and the cording wasn't tight enough.  Even with the boning it was far too flexible.  I spent the next 45 minutes unpicking!


And went back to sewing the cording channels in the old way.  I really didn't think that there was enough space for 4 lines of cording but I was wrong and the effect of that extra run of cording is noticeable.


The only thought I do have is that I could possibly have (should possibly have?) ordered wider bones for this panel.  If you look at the picture there are three lines of cording.  The next size up in boning width and it probably would work but I'm not that fussed, and definitely not unpicking it all again!  Just a mental note for the next time ;o)  What interests me most about this little observation is that the images in Corsets & Crinolines really aren't illustrations but very detailed road maps; if you read them properly that is!

And I'm late to bed... g'night everyone.

The Pak Choi Experiment continued....

I'm really enjoying this experiment of mine.  No more daily photos, as growth is slower in the soil, but this was progress after a couple of days.


And this is yesterday... though looking at the pictures and maybe growth is that much slower after all!


The second Pak Choi isn't doing quite as well, but I am so enamoured by this little experiment that I've decided to try it with celery as well.  I'm also trying it with the celery slightly raised above the water on toothpicks.


My counter top is looking busy!


The herbarium is doing well, particularly my parsley, which I have never had any success in growing before.  I do love my little pot garden.

Wednesday 24 April 2013

Bones all here...

Gotta love Vena Cava Design, their service and delivery is spot on!  The bones arrived today as hoped, not that I did much with them as I had coursework to complete and decided to focus on that first (all done now though, I'm pleased to add).

That said, I had a quick look and I think they'll work nicely... we'll see for sure tomorrow?  Friday?  In the meantime, lets see if I can sleep without dreaming about installing the spoon busk; ooh,  the excitement!

Magnolia, Wordless Wednesday 24th April 2013


Monday 22 April 2013

A few things that I forgot....

I forgot to mention the lovely boyf's genius moment!  The doubled over florists wire was struggling down the longer channels on the first of the larger pieces that I was cording.  It took him all of a nanosecond to appraise the situation and come up with the solution; thank you!  I didn't think a single length of wire would be strong enough but, for the most part, it slips straight down the channel and the tiny loop at the end is no wider than the bend of the doubled over piece.  So darn simple.... why didn't I think of that?!?


What I need now is some corset bones, I "measured" up last night and ordered them today. There's a certain amount of guesswork in the measuring; length was fine but width is a matter of judgement, in all cases I've gone for narrower widths.  They should be here by Wednesday, we'll see then how I did...


But, in the meantime, my spoon busk has arrived!  It fits the pattern piece perfectly but I'm not entirely sure how it fits me! It is certainly interesting but it looks just gorgeous and I love the shape; I've read a few posts that say they're a pain to fit and not worth the extra hassle.  I do hope it's not the case as, so far, its surpassed my expectations.


And finally, the Pak Choi experiment continues.  Out of the water, the rotting edges trimmed back and potted on.


It's joined the rest of the growing things on the kitchen windowsill... I really need my greenhouse ;o) and we'll see what happens.  The second, smaller, Pak Choi are still in water and in the sunnier spot vacated by these little guys.  I think they need to be a little more established before potting on, but am also slightly worried that they may not make it that far; fingers firmly crossed.


Sunday 21 April 2013

Regrowing Pak Choi, an experiment

I have recently become a fan of the gorgeous 17 Apart site and their great tutorials on regrowing certain vegetables, I decided to have a go with a couple of pak choi bases and have been keeping a daily photographic record.  I'm also having a play with a couple of thumbnail gallery tutorials that I found and this is my first attempt, thanks to the good folk at Southern Speakers.  If it works as it should, clicking on a thumbnail should open them up to full size.


I now need to plant my pak choi on and see if it will carry on growing as happily as it has done to date and I have further experiments to try with celery, green onions and possibly, maybe an avocado tree... it looks so gorgeous on their site and if I do ever get my greenhouse finished (a whole other post) I will need things to grow in it!

Saturday 20 April 2013

Cording, a lesson in patience!

Once again, I'm writing late, this post is mostly about Thursday's goings on, it's just been stupidly busy since then.  I did quite a bit of reading up on cording and everyone seems to have their own method.  I've picked on two to try; adapting the first based on this great tutorial by Jenny La Fleur, whose method I think I will use later on... I'll explain.

The first method that I chose involves sewing channels across the panels, threading the cord through them and then sewing closed the ends.  I chose because it is the easiest way to cord and a good opportunity to practise the technique: channel width, length of stitch etc.

Rifling through my threads box I found a reel that I bought for the original Space Mermaid costume.  I didn't use it, it was too light a blue for that costume, but it works well with the cabbage fabric.  To thread the cotton twine, I decided to borrow Jenny La Fleur's technique and will be using a length of florists wire.  I am using this technique on the smaller pieces which form the hips and following the pattern drawn out in Corsets and Crinolines.


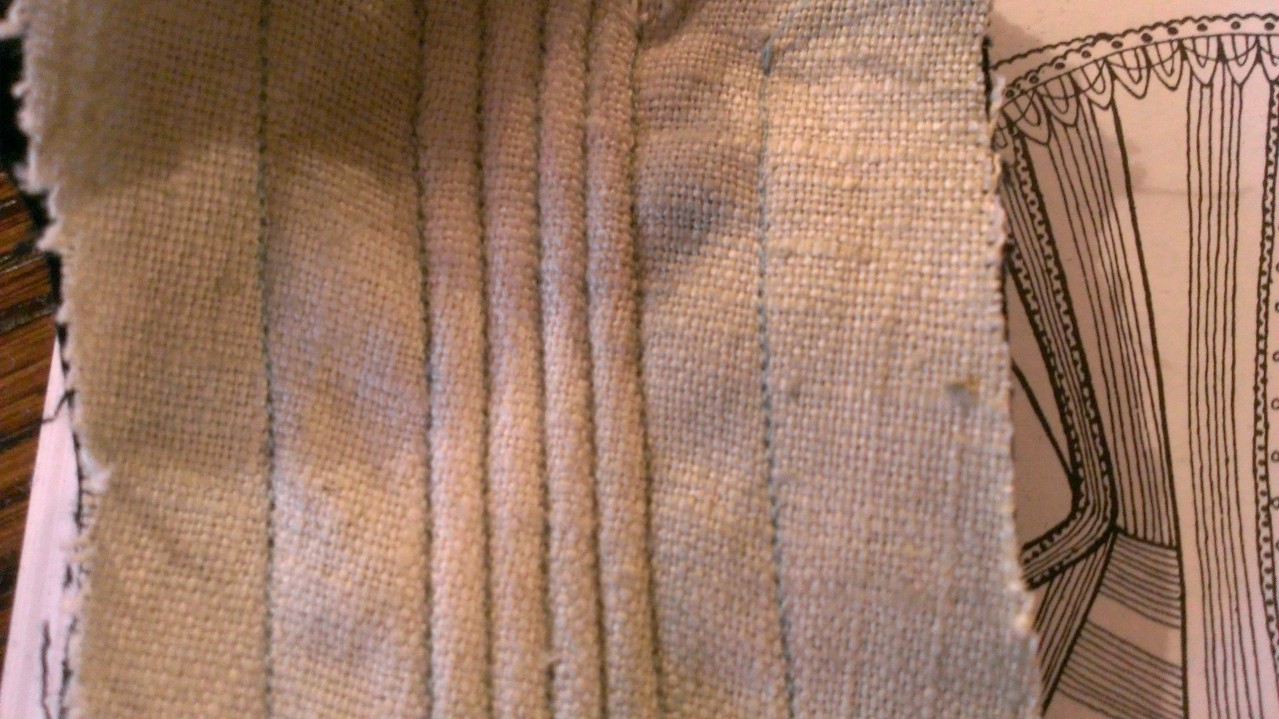
It started with lots of straight lines, using a short stitch (half the length of my machines standard stitch).  Starting at the top of the piece and running parallel.


Once the lines were all sewn in, I doubled the florists wire over and threaded the cotton through, doubling that too.


The florists wire was gently threaded between the top and middle layers and pulled through until the thread was in the channel.  Each end was trimmed an inch or so from the edge.


And you keep on threading...


Once all the channels were threaded, I ran a line of stitching down each side to hold them in place.


And then trimmed the ends as far back into the seam as I could.


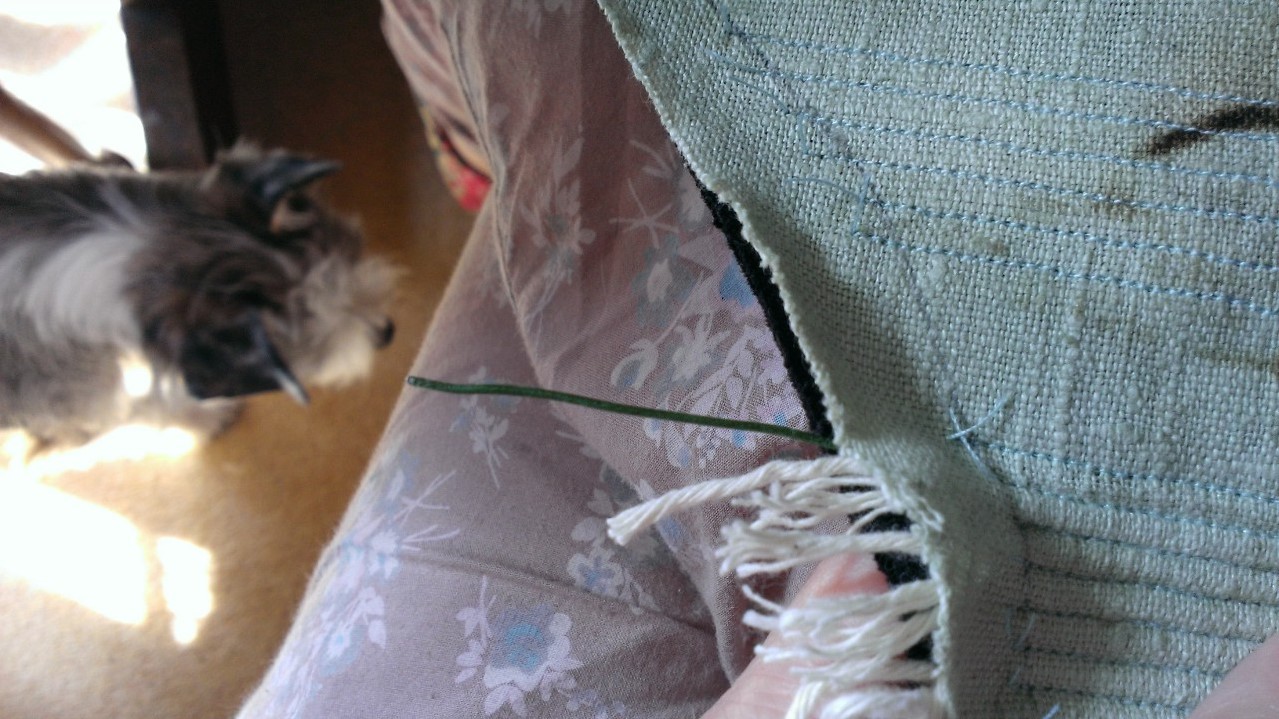
Thursday's efforts produced my first panel.  Today I finished my second, third and fourth.  I had hoped to do more but got the second completely wrong and the unpicking too quite a lot longer than the sewing did!  That panel has the dark green line through it (below) which I wanted to keep, so it was worth the extra time, if not the frustration!  I was then able to sew my first few panels together; I wanted to test the seam, as it is quite bulky.


With a very firm press, on a hot steam iron, the seam may be bulky by sits quite flat.  I have to be careful pressing, as you can see the heat and steam discolour the cabbage dye further (and yes, there's that smell again!) but I am going to hand finish these seams with a strip of bias binding, possibly in a contrasting colour to match the thread.


From the front, the seams sit very well and the extra bulk will, I think, also help with the shape.  The change in the fabric is quite extraordinary and the texture is amazing.  Such a simple technique yields such a strong and striking result, it could be quite addictive.


You will see I changed the pattern of the lines for the second pieces, it was an accident at first, but a happy one, I like the way the lines follow round.  I hope it works as I carry on around the corset, if not I have more of the blue and could make two new triangular panels. I should know for sure, if I get the chance, tomorrow.  In the meantime, the lovely boyfs only comment, "it looks a little like something they'd wear in Star Trek"... it seems I'm on to something here ;o)

Wednesday 17 April 2013

I'm just itchin' to get stitchin!

Whoop whoop!  It's happened!  Spring is finally here and with it, my itchy fingers!  I am desperate to get sewing again, it's been far too long.  I have thoughts of dresses, skirts, tops for the 11yr old, but what I need to be focused on, just for a little at least, is my poor, ignored corset and it's the thought of teaching myself to cord that's getting me all excitable!

So last night I dragged myself away from the late evening sun, ignored the whining dobe (boy was she in a funk), poured a small JD&DC (helped with the whining) and started cutting pattern pieces for the corset.  

When I dyed the linen I did not bother to unpick it from it's former skirt state a) out of laziness! and b) because I wanted to see what effects I could create.  The first job was to unpick it, iron the creases (ooh, the cabbage smell is still there...) and take a few quick photos in the garden; finally you get a hint of it's true colours.  The waist seam and darts created some interesting effects, maybe not the darts themselves but the patterns either side of the folds.


Cutting the pattern pieces is (I'm half way through) proving to be really good fun.  The two patches of purple/blue/green in the picture above will be used for the centre back panels of the corset.  Other pieces were placed to make the most of the various other whorls and burn marks on the rest of the fabric and the last pieces, the background pieces, if you like, are "matched" so that they don't clash, but blend, with each other.

Each piece was drawn around in pencil (linen + tailors chalk = dust!), when building this corset straight lines and exact measurements will be a must, and pinned to two layers of black cotton drill.  I have decided not to use a coutil layer on this corset, I think that the cording (of which there is lots) should give me enough shape.  I think that coutil would make it too stiff and whilst I still want a strong shape, my whole attitude to this corset is softening: the colours, the textures, the construction.  My Selene is becoming a less warrior, more nurturing, goddess.  (And, if all else fails, I buy some coutil and line the corded top layers with it!)


The last pieces to cut tonight and then a few test corded pieces (little dance!)  Having googled the various options for cord, I am going to try my faithful cotton twine.  I quite like that it will make an appearance in yet another costume; I should start a "100 things to do with.." list :o)
Related Posts Plugin for WordPress, Blogger...
© Lucy Green. Powered by Blogger.