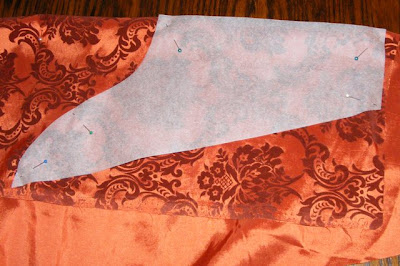
After a day of hard graft, I had the house to myself on Saturday evening and decided to make the Foresleeves (my first lesson of the evening, they're not Oversleeves at all!) for my Tudor costume. My second lesson was to pay attention to the naggy little voice at the back of my head. I knew the sleeve that I was tracing and cutting out was too small. I checked back on my notes and it wasn't Sleeve 3A (the one I did want to be cutting out) but 3C. I don't know why I got as far as cutting it out of my fabric before I sorted myself out, but I was convinced that I was making Gown C and therefore had to be wrong. Well, I was wrong, just the wrong wrong. The pattern pieces that I cut out are safely tucked away should I ever decide that I need a second burnt orange Tudor costume and I started again...
As ever, Ms Anderson was not much help. If I was slashing my sleeve and adding false puffs, there were a wealth of instructions. To make a simple sleeve, the instructions were wonderful in their brevity: "flat line the pieces" (there or there abouts). I knew what I was aiming for and went my own way.
I cut two pieces out of the top damask fabric and two out of the black cotton drill.
| This is the wrong sleeve, but you get the gist :o) |
Pinned them together, right side to right side, and stitched from one end of the narrow closure at the bottom to the other end.
The sleeves were turned inside out and pressed. When pressing them, to ensure that the seam is pushed out fully, I like to run a ruler around the inside of the garment, against the seam, and follow it with the iron. I gives a lovely sharp finish to the edge.
The bottom hem was turned in, pressed and slipstitched closed. It is the wrist of the sleeve.
Working from the wrist to the elbow end of the sleeve I marked four points; one at either end and two equidistant in the middle. At the elbow and on the two middle joins, I slipstitched both sides together, through all four layers of fabric, for approx 12mm to give a nice secure closure. The cuff I will come back to.
The Beaded Detail: with the sleeves done Saturday night, I was awake about 6am Sunday and decided to have a play with some ideas for the beading on the sleeve. I love a quiet dawn and a good cup of green tea at times like this. In my research I have seen many jewel finishings for these sleeves that look like six-petalled flowers, usually in gold with a gem in the centre. I wanted to replicate this, but using the same beads as elsewhere on the outfit. In stitching the damask layers together, I deliberately left the stitches visible, as a little guide to myself for the beading. The beads that I use have flat edges around the centre hole and I wanted them to be hidden. If you stitch a bead on with one stitch, it will invariably sit upright (as shown below), exposing the edge that I wanted hidden.
A second stitch will pull the bead down onto it's side (see below). To create my flower I sewed a centre row of black, amber, black...
and then two black beads top and bottom, off centre to the middle row.
At the wrists I decided to put a hook and eye in. Once again I'd gone a size up and the fit had ended up being tight. I'm no longer sure if it's me, the pattern, or just as its supposed to be and simply feels odd a few hundred years later! In my googling I'd read a few mentions of hook and eye closures at the wrists, it seems a great deal easier than trying to ease a tight fit over the ruff and cuff. My beaded flower on this join was split in to, the middle and one row of two on one side, the second row of two on the other.

I also added a ribbon tie, in keeping with my Holbein lady. Ties all the way up felt a little fussy, but I like the one at the cuff.
A pair of finished foresleeves.
And then it was time to try it all on. If I made this again I'd make the smock sleeve possibly as much as half as deep again, the puffs are neat, I would like a little more umpf! I need to put eyelets in the top of the foresleeves and the kirtle sleeve and then thread them together, that might give me a little more to play with on the smock sleeve, once I can relax and not expect the foresleeve to slide off. But, overall, I'm delighted. The bead detailing is the first real bit of glam I've got attached to this outfit and I love the way that the lining has turned to create a black border on the openings. All in all, a good evenings/mornings work.


No comments:
Post a Comment