Thursday, 29 March 2012

It's Crazy Hair Day!

We were up at 6.30am, the 10yr old and I, and whilst the lovely boyf did all the morning jobs we set about creating Hare Hill.

Thanks to the lovely rockabillie and her very good video on YouTube we decided on a retro pinup style, with Victory rolls.


Not quite as good as rockabillie, my slightly lopsided first attempt still did a pretty good job of representing the rolling hills of Hare Hill, especially once we'd sprayed them glorious green!


After that it was easy, a floral clip to keep her fringe to one side and the Hare hairbands did the rest.


A quick touch up with the green hair spray and we were done...her face says it all, we were delighted!  It was really good to see our initial idea come together so well, and it could (with my lack of hair dressing skills!) could have been a stress-filled disaster!  What's more, we got third place! Hooray!! 


And to top it all off, brushed out, the hair worked well for movie night too!

Sunday, 25 March 2012

Pumpkin Damask!

The lovely boyf was in Chicago and Des Moines last weekend, watching rivers turn green (St Patrick's Day in Chicago looks a blast) and enjoying his Dodge Challenger; it was a proper boy's trip!  It left me busy, but in a lovely way and by week's end the 10 yr old has developed a fantastic addiction to hoovering the living room and I am utterly in love with having the dobe glued to my side.  It was something of a shock to wake up this Saturday morning facing my boyf again, rather than Megs' whiskery snout!

I was given a wonderful commission to design a wedding website for my dear friend Mr S's lovely fiancĂ©e.  To be a part of such a personal journey left me realising how well you can know your friends, and yet how little you may know them too!  It took a few goes to get it started until an utter stroke of luck and I found this clipart.  I am infinitely jealous of, the soon to be, Mr & Mrs S's ability to dance and this image is them, caught in time, a snapshot of the grace and  joyous exuberance with which they move together.  It's half built and I was finally able to show them on Thursday, I think they like!

Midweek I suddenly also got an urge to sew something.  Normally, when the boyf goes away, I start the next part of a costume but I have been feeling rather despondent about my Elizabethan costume since the farthingale fiasco and whilst I am happy with the changes that I decided upon I have let it sit for a while, while I find my feet again.  So instead I continued to use up the leftover cotton drill, this time on a cute little dress from BurdaStyle.  I very rarely make day-to-day wear for myself any more so initially it was simply going to be a "muslin" to see if I still had it in me! but it's box pleat skirt works really well in the heavier drill, I will post some photos shortly.

Finally, when buying the zip for my new dress, I had another stroke of luck.  Deep down in the remnants bin, which I never normally look in, I found this... a deep orange and russet shock of fabric (the colour is closest to that in the shade).  It got me all quite unnecessary and excitable, and at £6 for just over 2 yds, it was a bargain to boot!  I'm fairly certain, in the cold light of day, that it's not enough to do too much with, but it will feature in the costume somehow, somewhere.  Teamed with a beautiful dark grey, it should be both Halloweeny and elegant... I am excited to get stitching again!

So, roll on payday, I am eyeing up some lovely cotton lawn on ebay and have a tudor smock to make...

Sunday, 18 March 2012

Herby Tuna Dog Biscuits

Now that we are finally running low on liver biscuits, I decided to see what else was in the cupboard and make Megs some new ones... plus I can't work my way back up to liver again so soon!  Tuna seemed an easier option.

Megs' Herby Tuna Biscuits

1 tin Tuna in Sunflower Oil
450gms Allisons Wholewheat Flour with Seeds and Oats
6 tbsps EVOO
1 tsp dried Oregano
1 tsp fresh thyme leaves
4 Sage leaves, finely chopped

Preheat the oven to 180C.  Put all of the ingredients into a mixing bowl and mix on a medium speed.  Your dough will look crumbly (large crumbly) but holds enough moisture to shape once you handle it.  

Crumbly tuna biscuit mixture.
I formed my dough into flattened balls again, Megs seems to like them and I was being lazy!  I got 24 1.5" balls out of the mixture.


I baked them in the oven for 25 minutes, then turned it off and opened the door by an inch or two.  I will leave them in there till the morning to harden.  For softer biscuits, take them out to cool after the 25 minutes.

Vegan/Veggie Alternative: to make a meat free version I would mix all of the other ingredients and crumble or cube tofu into the mixture at the end, mixing it in gently with a spoon.  To account for the oil in the tuna, you may also need to add another tbsp oil.  Next time we have some tofu going spare I'm going to make them.

Based on the soundtrack of endless whining from my new shadow Megs as I made the biscuits, I think these will be popular.  We'll see tomorrow morning...

19th March... they look good and Megs likes them, only slight issue is that they crumble... we need to keep the dustpan handy!


Happy Mother's Day!

It started with this, a handmade tulip that I sent to Mum...


She (and Dad), in turn, sent me these!  I just love tulips and daffodils...


As the 10yr old was at her father's, and the boyf in Chicago (you have to love modern technology, 4000 miles apart, we propped up his hotel bar last night and chatted, thank you Skype!), I spent the morning walking my non-human girl :) and on our way home were joined by the little orphan robin who we looked after last spring.  A year on and he is one of my true joys, often joining me when I garden or scrounging a treat when I feed the chooks; but the most special experience is when he walks Megs with me, hopping from fence post to branch to fence post as we walk around the paddock. Today he flew off and beat us home, waiting on the back fence as I came in the garden...


I bought myself a Mother's Day treat, a lovely new "seed head" bird feeder that I hope will entice Robin, and some of the other birds in the garden, just a little closer to the house....


And now the 10yr old is home :D and I'm a billiant Mum, with a badge to match!  We're going to bake and make dinner and eat sundaes whilst maxing out on Glee...


It's turning into a rather wonderful day.  I hope you enjoyed yours x

Saturday, 17 March 2012

Crazy Hares... the last you'll see till the day itself!

The 10yr old and I had the morning to ourselves and made the most of it, finishing off the Crazy Hare Hill... well, it's 90% there, but the rest will wait for the day itself.  

For a little splash of colour we cut out a dozen tiny, four petal, flowers from red and pink felt, folded them in half and pierced them with the awl.


They were then threaded onto a length of florists wire and turned round so that their petals all faced upwards.


The wire was then bent and twisted into a stem,


and wired onto the hair band. Before being covered with florists tape.


A toothpick and cartridge paper made a great signpost, which was also attached to the hair band with wire and tape, and the 10yr old had a little test model of our handiwork.


We've also started on the final part of Hare Hill, a beautiful felt mosaic half-rainbow.  


We will attach that and show you the final result on the 29th... I'm excited, as long as I can get her hair right the 10yr olds' going to look sooo good! 

Friday, 16 March 2012

Been having fun with my FB cover photo...


Inspired by some truly fabulous designs that I saw on the Wix blog, I decided to have a play with my FB cover and profile pics.  I love QR codes and the fact that these work, even on screen. They kept the boyf and I amused for hours the other evening... we are such a pair of geeks!

Crazy Hares, part 3

Yesterday afternoon I held my breath, rather a lot, as I beat up my hares attaching them to a pair of hair bands.  They are so lovely and delicate, compared to my usual sewing projects, I was rather nervous of causing irreparable damage!  As it was, things went very smoothly and I'm delighted with the results.

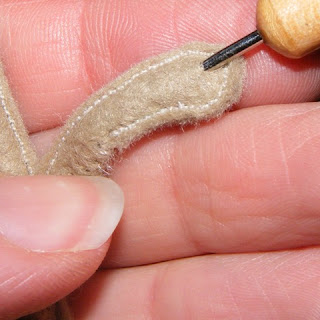
Once the 10yr old had decided how the hares would sit on the bands, I gently made a hole in them with an awl. 


A length of 20 gauge florists wire was folded in half and the bent end eased into the hole, and then as far up the hare as I could, for maximum stability.


Where it left the hare's foot, I gently twisted the wire and then stitched a couple of holding stitches. The two wires were then separated twisted around the hair band, either side of the hare, to hold him in place.  The 10yr old tested things....


and I covered the wires with florists tape.  The same was repeated on the second hare, who was wired through his back legs.


The 10yr old and I are now cutting out mini flowers to wire around our hares, the rainbow is still being pondered on (though the wondeful Mr S came up with a fine idea...) and I am tasked with the  signpost.  My project for this evening, I think, as the boyf is off to America for a week and the 10yr old and her friend Sarah will be watching movies and eating junk food!

Tuesday, 13 March 2012

The 10yr old's bedroom.. it's Parfait!

Call me a control freak or, as the 10yr old would say, “a meanie”, I don’t mind…  I will happily admit to having the sort of Decorator’s OCD that means that only I can do the job properly! 
In my funny little world, there is nothing worse than a badly decorated room and in particular a badly painted room.  Moreover, try as I might, I am not a fan of masking tape and rollers etc. I paint with a 2” brush and a 1cm wide artists brush for tricky sections and edges.  Time consuming it may be, but it requires nothing more than patience, a steady hand and a keen eye.  I’m also a temperamental decorator, leaving projects for months and then trying to finish them in a day, but on the days when the mood strikes, I’m a very happy painting bunny. 
And I really am best left to my own decorating devices; that and, on the occasions when I forget that he’s not that fond of a paintbrush, the boyf’s kind and valiant painting attempts generally end in emergency trips to the washing machine for whatever anyone in the vicinity is wearing and me “just touching up” whatever he's painted afterwards!  As for the 10yr old, she is still only 10 and I will happily admit that I do not have the time or the patience to share the experience.  I would love to be one of those laid back Mums who let their children help paint their room and live with the results but, in all honesty, it would drive me mad.  The child will learn to paint when she buys her first flat...
And so it was that I found myself painting the 10yrs old’s room last Sunday.  It was a lovely day to be painting, the sun streaming through the window and the birds singing up a storm.  The colour she chose is a beautiful soft blue-based pink rather appropriately named “Parfait” – its name alone was a very neat way of ending an otherwise long debate!    
It was such a joy to get it finished.  I didn’t like the colour of her room before, but I hadn’t realised just how much I didn’t like it until it slowly started to disappear.  Painting done, we rehung her pictures and stuck on a gorgeous “Family Tree” wall sticker from Cox & Cox.   A great deal of her pictures were framed family photographs and this is a far neater alternative to them.  A quick shuffle of furniture and a “new” shelf unit from the antiques market (to house the teddy/unicorn collection that she’s inherited from her Nana Nicie) and the transformation is complete.

I love the 10yr old’s room.  It is a mad clash of fabrics and colours and collections.  Full of books and bits to look at, a wall of stars and a fantastic view and soundtrack outside.  I know that she would have liked to have helped paint, I hope that the “Surprise!” was enough to sway her… and there’s always her playroom next door, you never know, I might need a hand with that?

Monday, 12 March 2012

Nut Cheese Conchiglie with a Spicy Tomato Sauce

I wanted an excuse to a) make another Nut Cheese and b) do something really good with the packet of Conchiglie pasta that has been lurking in the back of the cupboard for a couple of months now... I am mighty pleased with the results.

Three Nut Cheese.

This is an adaption of my previous recipe, just a couple of tweaks to make it better!  I also made A LOT this time, some for the stuffed pasta shells recipe that I have floating round in my head and some for just plain eating and enjoying.

500gms Cashews, Macadamias and Slivered Almonds (I had 250gms of cashews and equal amounts of the other two), soaked overnight in water
120-180ml Oatley Creamer (an vegan alternative to Soya with a more neutral, less sweet taste, I love this stuff!)
8tbsp lemon juice
6 tbsp EVOO
6 tbsp mixed herbs (I combined a tbsp. each of dried Basil, Oregano and Parsley with chopped fresh Rosemary, Sage and Thyme)
2tbsp Nutritional Yeast
1tsp Agave Nectar
Good pinch Salt (1/2 tsp or so)
Black Pepper, to taste
Chopped chives to serve

Once soaked, I drained and blitzed the nuts (in batches) until finely ground.  Each batch I transferred into a large bowl and the added the rest of the ingredients, mixed well and seasoned to taste.  I added the Oatley Creamer last and slowly, building up the texture and creaminess of the cheese: at 120ml I had a bonded but dryish cheese and at 180ml it was far creamer.

As the previous recipe had mixed all the ingredients in the blender I transferred a small amount back and blitzed it again but honestly could not discern any greater smoothness in texture.  The initial grind is important to ensure fineness, if this is done thoroughly enough you don’t need to repeat it. 

When I serve or use the cheese I add chopped chives to garnish; I don’t add them before as I don’t like the change in taste if they sit in the cheese too long.

As I don’t have a big blender, this was a far quicker and easier way to make a larger amount of the cheese.  I like the taste and texture of the additional nuts and the less nectar/nutritional yeast/more (fresh) herbs combination.

In celebration of a job well done, I lathered some on toast… there may just be some left to cook with later!

*   *   *   *   *   *   *  *

Spicy Tomato Sauce.

2 x 400ml tins chopped Tomatos
3 tbsp thyme leaves
1.5 cups frozen Peas
1tbsp Vino Cotto
1 tsp Chilli Flakes 
Season to taste

I blended all of the ingredients, except the peas, together.  Then added the peas and warmed them through.

*   *   *   *   *   *   *  *

Nut Cheese Conchiglie with a Spicy Tomato Sauce.

500gms Conchiglie Pasta
Nut Cheese, two thirds of the amount made above
Spicy Tomato Sauce

Cook the pasta until pliable but not cooked through, strain and leave to cook.


Mix another 80-100ml of Oatley creamer into the Nut Cheese, along with 2-3 tbsps of fresh chopped Sage, Chives and Thyme.  Season well.  


Blend with a handheld blender until smooth.  Spoon the nut cheese into the pasta shells, approx. 1 tsp per shell and lay in an ovenproof dish.


Pour the sauce over the pasta.  Top with grated (vegan) cheese if desired and bake in a pre-heated 200C oven for 30 minutes.  Serve with warm garlic bread and salad.

Crazy Hares, part 2

I just couldn’t get them out of my head and so Saturday morning I bounced downstairs, nicked some stuffing from the foot of what was once Meg’s favourite Puss Cat and got to work filling my two little hares and giving them eyes. 


It’s surprising what you can do with a chopstick and a paintbrush but if I keep this up, I may need to invest in some proper tools one day...


I slip stitched them closed, sewing the threads back into the bodies and trimming, and tiny seed beads made good eyes.                               


The rest of our hill is slowly coming together in my mind.  What I need is florists wire and tape and after proving unlucky at a number of local florists I finally ordered some online from a cake shop!  I await their arrival with impatience….

PS don't you love my new laptop vinyl?  Van Gogh's Blossoming Almond Tree.  Just beautiful!
  

Friday, 9 March 2012

Crazy Hair Day 2012, part 1

One of our favourite things about the 10yr old's school is Crazy Hair Day; their rather unique take on the traditional Easter bonnet parade.  Last year, relatively new to the school, utterly nerve-wracked by the calibre of previous entries and in a last minute panic of sorts, we nevertheless got to third place thanks to stars, ribbons and two pairs of chopsticks!


This year, however, we are prepared!  It is our second and last chance and we have big plans that include  dye and buns and proper accessories and even an Easter theme, of sorts.  The 10yr old this year wants to go as a "Hill of Hares... geddit!"  CHD this year falls on the 29th but as the 10yr old is away at her father's this weekend, so I thought that I would start on the hares.  Without the hares, we don't have much of a hill, so I wanted to be sure that we had good hares.  I decided on stuffed felt hares and as they are not big and as detailed as possible, I decided to leave the seam stitching visible, rather than turn them inside out.  

I drew two templates, a sitting hare for the front of our hill and a joyous leaping one for further back.  


I cut roughly round each template, pinned it to the felt, which I had folded in half, and stitched it with a very short stitch.   


The stitches perforate the paper enough that it can be easily pulled away; if any sections stick, dampen the paper to loosen it further.


And I have a hare.  


Finally I trimmed round each hair, no more than 1-2mm from the seam ready for stuffing, eyes and for me to figure out what to do with them next.


More on the Hill of Hares as it progresses....

Wednesday, 7 March 2012

The finished bunting


A little late in posting the pictures, I finished the bunting with buttons, bows, bead, embroidered flowers and a buzzing bee.  I'm pleased with Lottie's bunting, it's delicate and pretty and oh so little girlie... and best of all, it apparently will go very well in her bedroom.  Lottie herself is a precious little thing, I am looking forward to getting to know her better :o)

Friday, 2 March 2012

Lottie Mai's Bunting, a tutorial

This Saturday we will be meeting my new niece, Charlotte Mai, born in January.  When her older brother Alfie was born I made him a giraffe quilt...


but for Lottie I've decided on bunting.  I made some for the 10yr old when she was 4 or 5, as decoration for a birthday party and it's been used and enjoyed ever since.  Hung inside or out, I love bunting and I'm hoping that Lottie, and her parents!, will too.  I found a 'fat quarters' bundle of polka dot fabrics which set the tone for the rest of the project.  I am not a huge fan of pastels, so I pulled in a couple of darker colours including my favourite apple green thread and a beautiful teal satin bias binding.


I drew out her name in a soft, curvy font.  Gentle and not too fussy.  I like to play with drawing out my own fonts, but you can print pretty much any font in a large enough size to use as a template.  I then cut the letters out to use as templates.


I ironed bondaweb onto the four felt fabrics that I had chosen and traced the letters.  They must be placed on the bondaweb in reverse; otherwise they will be back to front when you turn them over - far too often I've made this mistake! 


I then cut out a triangle template, which I laid onto my various cottons and used to cut out my bunting. I used pinking sheers to give them that distinctive bunting edge.  Once I had enough triangles I mixed and matched them and the lettering until I was happy.


On a spare triangle I added a little owl, which is based on a couple of designs that I found online.


To attach the triangles to the bias binding, I laid the binding face down.  The fold of the bias binding that faced me would be the top of the bunting once finished.  I laid the triangles out, right side down and with their points facing away from me and then slipped each triangle under the fold of the binding which was closet to me.  I pinned them in place.


I then sewed a zigzag stitch down the pinnings, turned the bunting over and, to secure the bottom fold, sewed a straight line underneath the zigzag.


The basics finished, it was time to add some decoration.  I raided the button box, draped the bunting across the dining room and started to pin the decorative pieces in place. 


Tonight I'll sew them all in place and may also add some embroidery.


What I used: fat quarters of cotton fabric; felt for the lettering; bias binding; bondaweb; assorted buttons and beads.
Related Posts Plugin for WordPress, Blogger...
© Lucy Green. Powered by Blogger.