Monday, 27 May 2013

The Corset - half done!

Out of paint and with not much else to do, I decided to put the next panel of the corset together.  That went pretty well and, though I was planning to call it a day, I then decided to "just try" the center back panel.  After that, with my little family all dozing on the sofa, it didn't take much self-persuasion to have a go at the center front panel, spoon busk and all.  I have half a corset sewn together!  Yes, there's a huge amount still to do, but finally, I have half a corset sewn together and it is looking good!

This is what started it all.  On the right is the second gusset piece that I stitched together last night.  I pinned and stitched the three pieces together.  The center and right hand pieces have a small spiral bone, the center piece bone slipped neatly in between the seams and the right hand bone I inserted into the piece and then ran a line of stitching down the outside edge to hold it in place.  I will finish the detailing on them later.


Once the top panels were finished, I added the bottom piece - my last set of measurements work very well.  This is the first time that the three top pieces have fit width wise across the bottom piece.


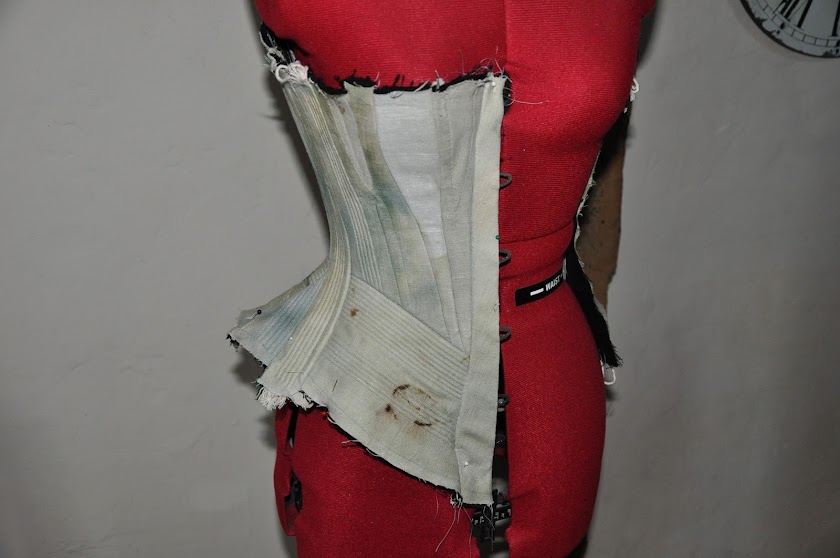
I sewed the new panel to the first and that is where I planned to leave it... the photo below captures the colours of the linen very well.


The back panel starts with a traditional seam; sewn in right sides together, pressed open and then folded over and pressed again.  The panel has a wide steel bone on the seam edge, a run of eyelets and a thinner bone on the other side of that.  I drew in the lines for each bone, measuring the width needed for the eyelets in between.  There will be 10 eyelets on each side, I will get the lovely boyf to help me put them in another day.


Finally, the front panel and the spoon busk.  As luck would have it, the side I was working on was the easier of the two.  The front and lining pieces are laid right side to right side and the busk laid on top.  I marked either side of the clasps and then sewed the seam in, stopping for each break and double stitching either side of it for strength.  One seam with five gaps to slip the busk clasps through.  Changing the sewing machine foot to a zipper foot, I then ran a line of stitching down the outer edge to hold the busk in place.


The center back and busk panels were then sewn to the the main panel piece (the busk to main panel was the single most nerve-wracking line of stitching I have sewn in a very long time!) and I was happily doing a silly dance or two around Miss G.  Oh, and taking lots of photos!  I am going to insert a spiral bone along the bottom seam too, to kick out and stiffen the shape at the hips.  I mocked it up with a spare spiral but will order two longer ones so that they will run from the busk to the back bones.


I just adore the shape of this corset and the hip in particular.  The texture of the cording and the weight are seductive.  I am seriously in love with this corset and can't wait to try it on... though there's a bit more of a wait before that happens, I shall have to be content to oogle it on Miss G instead ;o)

The Greenhouse, part 3

Up bright and breezy this morning, I fitted the edging trim to the greenhouse roof.  It's just glued in place with silicone beading to seal the edges.  Later on the boyf installed the windows at the front and either side of the doors.  He then lined the doors with perspex too; only the back wall to do now, but I ran out of paint, it will have to wait.  The front is pretty much complete now, all I have left to do is build my workbench and finish painting inside.


Megan seems to like it in front of the greenhouse, though yesterday as I was smiling at her liking my greenhouse, she was painting herself, she's going to be patchy for a while.

The Greenhouse, part 2

We have fully embraced some Bank Holiday weekend DIY, the lovely boyf and I, and ploughed on with the greenhouse.  Yesterday was spent mostly painting (me) and cutting the wood trim for the windows (lovely boyf), then we waited....  I hung my beautiful Indian mirror, which has been languishing in the garage, and planted out the tomatoes and beans that I was very kindly given this week.


The hanging basket needed to be redone, I'm testing a linen cloth liner... it saved a trip to the shops!

The lovely boyf continued his campaign to bring order to the garage, installing these amazing under counter drawers.  Ok, ok, so the drawers are not that amazing, but what they can hold is!  Gone are the boxes and boxes of muddled up tools, replaced by lots of lovely order :o)


I even managed some sewing, putting the second pair of gussets in in the corset.  It was a lovely, sun-filled and productive day. 

Friday, 24 May 2013

Potting on the Celery Experiment

The celery experiment is progressing nicely and has grown some amazing roots, which I noticed this morning as I changed the water.  The sensible thing would have been to plant it out at the weekend, but I had five minutes to spare :o)


I decided to plant it in my little herbarium.  A bit of a risk as, as my Dad and I have both found, the herbarium is a little temperamental with anything it seems but parsley!   I'll keep an eye on it and, just to make it really interesting, I decided to plant in the second Pak Choi too, which has been languishing in the pot with the first one I planted (PC1).


Don't they look pretty.... fingers firmly crossed!

In the meantime, look what has sprouted at the base of PC1.  


I really need to read up on Pak Choi... it's literally running away with me and I have no idea what I'm doing! 

Tuesday, 21 May 2013

Trouble in chookville?

We're not yet sure, but it seems that my lovely Sili could be a boy... and I'm not yet entirely sure what to do if that is the case!  As with most things animal related, everyone has their opinion and advice, none of which is proving conclusive, so until Sili either lays an egg or crows we will have to wait with baited breath. 


What I do know is that (s)he's now settling in beautifully with Macy.  Pre POL pullets definitely have brought a whole new dimension to my hen keeping.  It is lovely to watch them learning and growing up, I had not realised just how different they would be to the older girls (who were all at POL which is 10 weeks older than these two).  Calming them is very much a work in progress, they're still completely flightly at times and you can't help but worry that they might hurt themselves.  Treat times though are particulalry funny as they now recognise a good thing when it's coming but don't know whether to run or stay; if you've never seen a chicken dither, its an endearing sight!  They have also now got the hang of their training perch; there's still the odd wobble, but they will settle quite happily.  I knew that chooks will instinctively perch, I didn't realise that it would take them such a while to get the hang of it! 

So, the now SiliStu, in honour of StuStella who looks like the kind of roo Sili could aspire to be, has some clarifying to do and quickly please: the slightest sound from the girls in the morning, which is not long after 6am, and I'm wide awake waiting for that first possible crow!  I honestly don't know what it would mean long term, a roo was never part of the plan but, when I called the breeder for advice and was told nothing more useful than that they'd kill him for me, it cemented my initial thoughts... SiliStu is part of the gang and has a right to life, (s)he's certainly not inconvenient or disposable! 

That said, I'd be lying if I tried to deny that my fingers are firmly crossed ;o)

Sunday, 19 May 2013

The Greenhouse... my re-purposed dog run

For a while now, I have been planning a little re-purposing.  Megan's old dog run, which is a lovely Dutch Barn shape, was too nice to sit unused and I decided to turn it into a greenhouse.  Well, half a greenhouse, the other side of the roof sits under our elderflower tree and would get so little sunlight that we decided not to mess with it.  The sunny side of the run would be the greenhouse, the shady side will be our log store.

The roof was tongue and groove covered in roofing felt.  A few of weeks ago we peeled the felt back, cut out the tongue and groove, leaving the overhang at the bottom intact for stability, and exposed the beams.  We also removed the wire mesh from the sides and front. I've since painted the beams with black gloss paint and am slowly working round the rest of the building with white.

My original plan was to then insert traditional twinwall polycarbonate panels, but the boyf had a different idea.  He knows a man who can, and ordered made to measure clear polycarbonate panels instead, including a pre-shaped roof panel.  I wasn't sure about the roof panel but changed my mind the instant it went up.  It is glorious, and I love the contrast between its clean starkness and the wood beneath.  The panel rests on the wood overhang and the beams, we fixed it to them by drilling holes through it and nailing it in place with roof cleats.  I say we, I mean the boyf!  Here's a few photos.


What a view :o)

The boyf then set about tidying up the inside for me, hiding the gaps where the insulation was put etc.

I did what any sensible woman does during couples DIY: handed over the tools, found the nails and screws, and tidied up behind him! 


I was certainly dressed the part!


And there's that view again, whilst the panels are still clean and mirror-like shiny new.


I also recycled the last leftovers of our grass into three mats for the floor, prettier than what was there and easy to lift and shake out if they get too grubby.


I'm pulling together a few bits for the workbench too, as much as possible will be recycled. We need wooden trim for the front windows but hopefully they will go in next weekend and the bench can be put up.  I think I may also cover what's left of the felt with something a little nicer... we'll see, but it seems a shame not to as everything else looks so much better.

In the meantime, just outside the greenhouse, the alliums stuck their heads up sometime last week...


Perfect inspiration to grow something equally wonderful inside!


Related Posts Plugin for WordPress, Blogger...
© Lucy Green. Powered by Blogger.